
Having already created Cassandra's Nemea Shield and Pauldrons, I rounded out the set with her Digamma shortsword.

Its a bit of an odd piece - the blade is extraordinarily thick and decorated with raised Greek lettering. After gathering a lot of reference, I created a set of blueprints to reference during the build.

A friend of mine in propmaking, BlindSquirrel makes a TON of anime and gaming swords. One of his preferred methods for blade shaping is to glue two sheets of wood across a steel core. Blatantly stealing this process, I laminated two sheets of poplar around a 3/16" steel threaded rod. The threads will help the glue adhere to the core better than they would if it were just a smooth piece.


After the glue dried, I cut the basic shape of the blade with my bandsaw

The taper of the blade edge was done mostly with a belt sander, with further refinement performed with a sanding block and 80-grit paper.

In order to make sure the depth on the side cuts was uniform, I used my dremel tool to cut small "depth fillets" in the side of the blade. When all of these were sanded flush with the rest of the bevel, I knew I had the correct angle I needed.


For the cross guards, I decided to sculpt one piece out of wood with styrene accents, then mold it for an identical opposite side copy. Starting off, I took some of the scrap poplar from the blade leftovers and cut it to the shape of the wing-a-ling.

This was shaped on the beltsander until I had the desired teardrop profile.

By using blue painter's tape, I was able to trace the pattern on the blueprint, then transfer it to the cross guard.

For lack of a better term, I called these the "feathers." After removing the tape from the crossguard, I laid it over a piece of sheet styrene and trimmed the pattern out. The styrene parts were heated and glued onto the surface of the wooden master.

Symmetry!


Onto molding and casting! I used Mold Max 30 silicone and SmoothCast 300 resin to produce the duplicates.


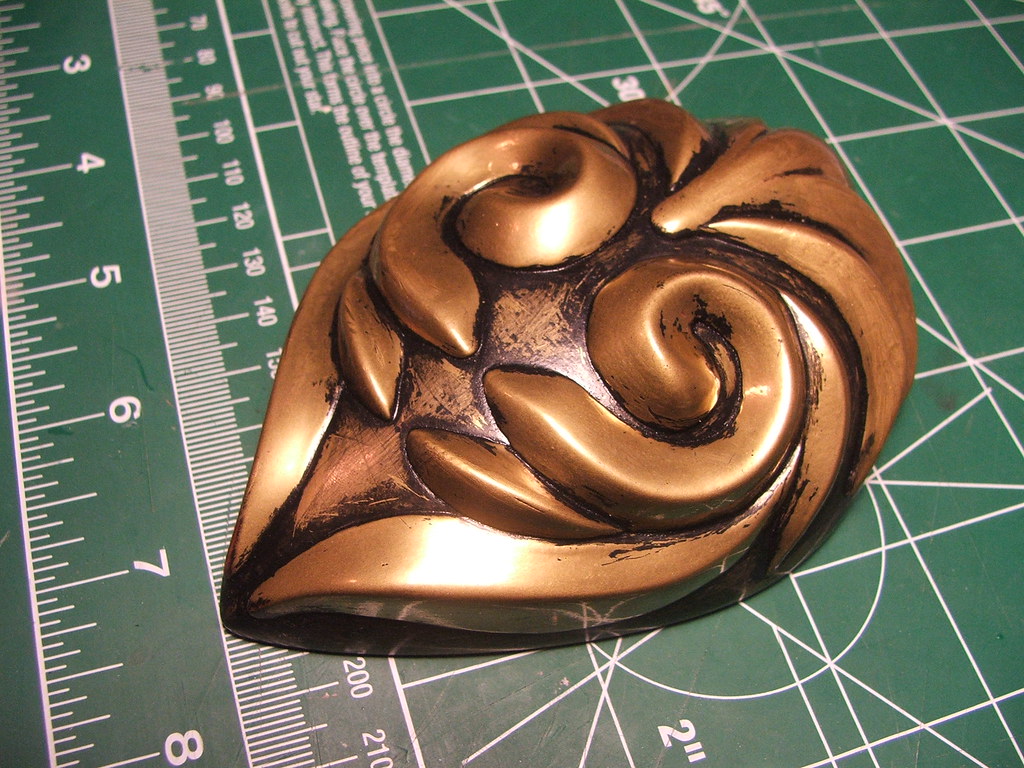
The crossguard cap (can you tell I'm just making words up?) was molded in a similar way, as I needed two of these as well. I started by making a master in MDF, then vacuumforming the shape in .060" styrene.
You can see the master in the back of this shot. The shape in the front is the start of Cassandra's Medallion she wears on the bottom of her blouse.

Here's the piece trimmed from the styrene. I pulled two of these and set them inside one another to create the beveled interior edge.


And after adding more styrene details like with the wings, it was ready for molding!


The long raised detail on the center of the blade was made out of a thin strip of sintra, shaped on my belt sander. The small bead along the edge is more half-round styrene.

Hand carving the Greek lettering on this piece would require a level of precision I don't possess, so I employed a neat trick I've seen some modelbuilders use. To make raised panels on small model ships, sometimes a sheet of vinyl will be cut into squares and molded over, making a very lightly raised edge in the cast piece.
I created a set of vinyl decals based off some of the game art from SoulCalibur 3 (references for IV were almost impossible to read!) and laid the lettering out onto the master. Don't bother translating; its all gibberish.

This piece was then molded in more Mold Max silicone. Perfect detail!

The final pull shows the results. Crisp lettering with each pull, and SO much easier than trying to inscribe a uniform set of lettering into both sides by hand!

Base painting was done with Krylon hammered silver for the blade, and Testors Antique Gold for the raised center and hilt pieces. Shiny!

A bit too shiny, really. To get the lettering to stand out more, I airbrushed acrylic over the center section, then wrapped a piece of 600 grit wet sandpaper around an aluminum block. By gently going over the tops of the letters, the gold was brought out from the brown "weathering" and stood out much better.

The rest of the sword was treated to similar weathering and accent colors.


The final element was a blue-leather wrapped handle and some light dirt accents in the recessed areas of the hilt and blade accents. I haven't built many bladed weapons, but I really love how this one has turned out.


And together with the Nemea shield!

Higher resolution images are available on my flickr page. Thanks for reading!