
As part of another joint costume adventure between myself and my friend Cathy over at God Save the Queen Fashions (some readers may recall her work on the Daft Punk leather ensemble)
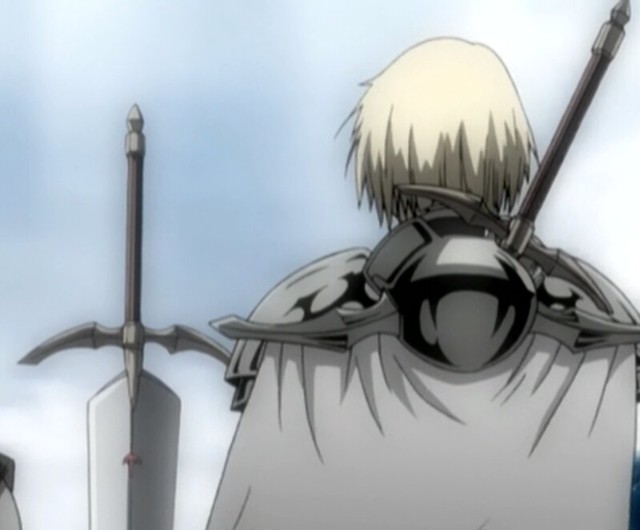
I was drafted to create the sword and armor for Clare, the protagonist
in the series Claymore. My experience with armormaking are pretty minimal at best, so this was all one big learning lesson for me!
While not fully encased in a suit of armor, the Claymores do have many parts that make up their outfit. All told, there are 2 sets of shoulder pauldrons, a chest clasp, a sword carrier/backpack piece, a plate skirt, wrist cuffs, handplates and greaves.

While not fully encased in a suit of armor, the Claymores do have many parts that make up their outfit. All told, there are 2 sets of shoulder pauldrons, a chest clasp, a sword carrier/backpack piece, a plate skirt, wrist cuffs, handplates and greaves.
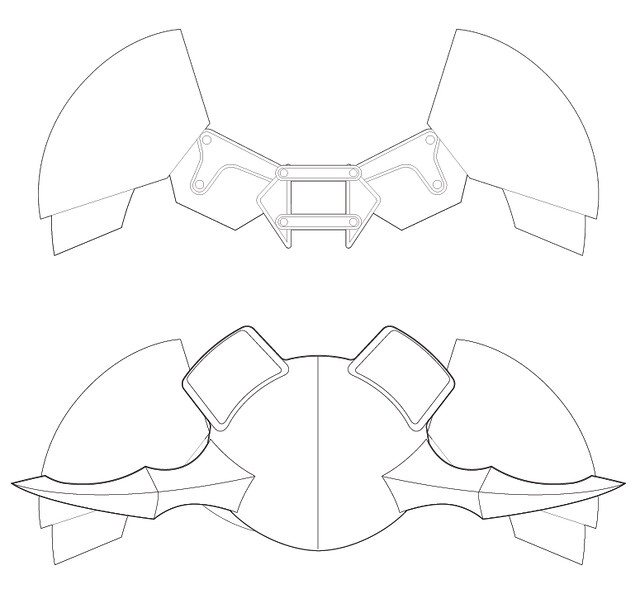
After collecting a lot of reference images from the series, I set about putting together a few sets of blueprints.
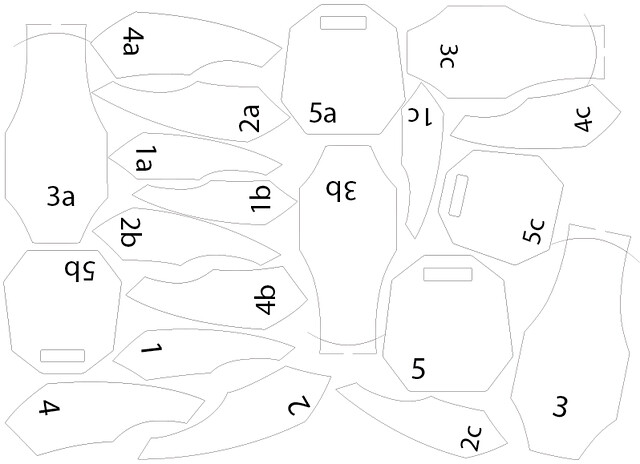
This print shows some of the test patterns I used to make the skirt. These were printed out on a plotter and trimmed at full scale to check which size would be best for the final parts. Mockups like these were essential in order to get the scale of the armor parts just right.

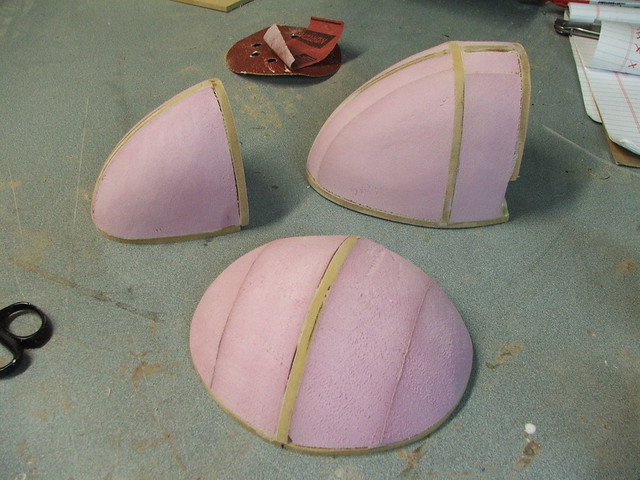
The middle blueprint above shows some dome-shaped parts. These were profile and front views used to pattern out the shapes of the shoulder armor and the backpack dome. Much in the same way my Daft Punk Thomas helmet took shape, the mold masters for these parts started out as MDF spines outlining the outer edges of the shapes.
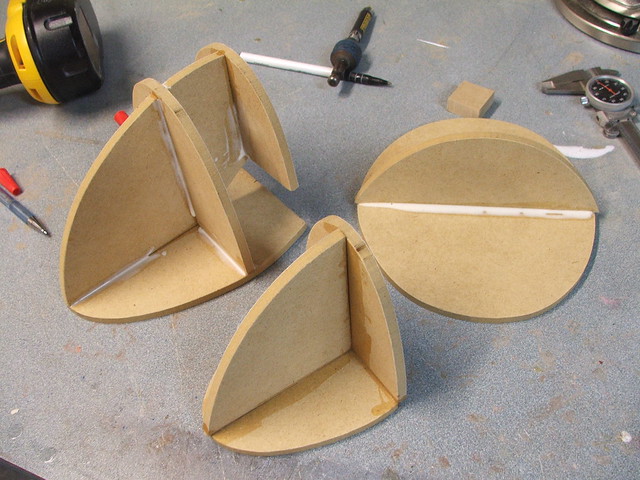
The cavities in these blocks were filled with pink foam, sanded to shape, then skimmed over with bondo to smooth out the entire buck.
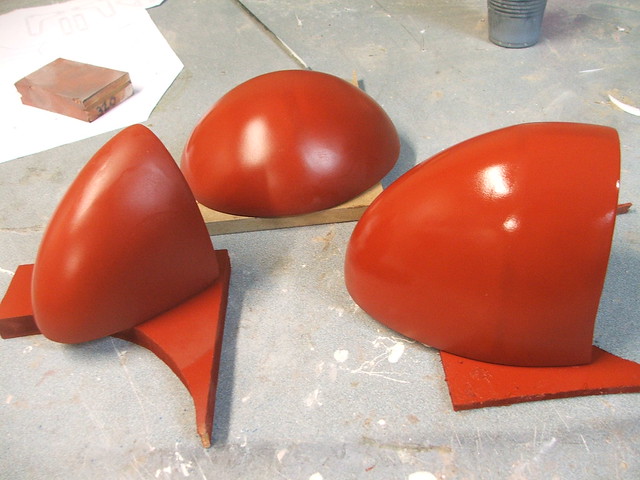
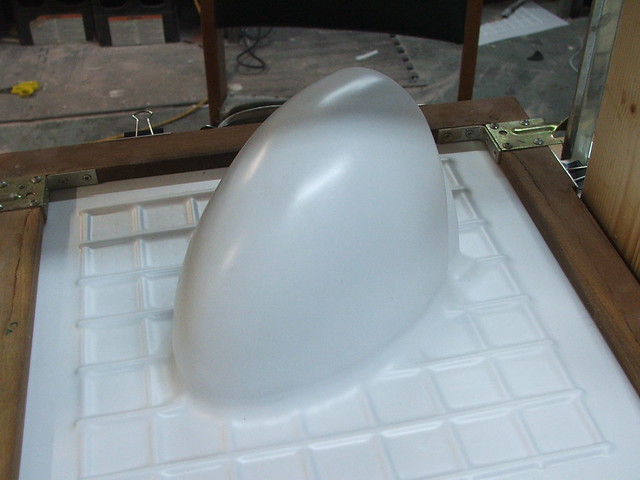
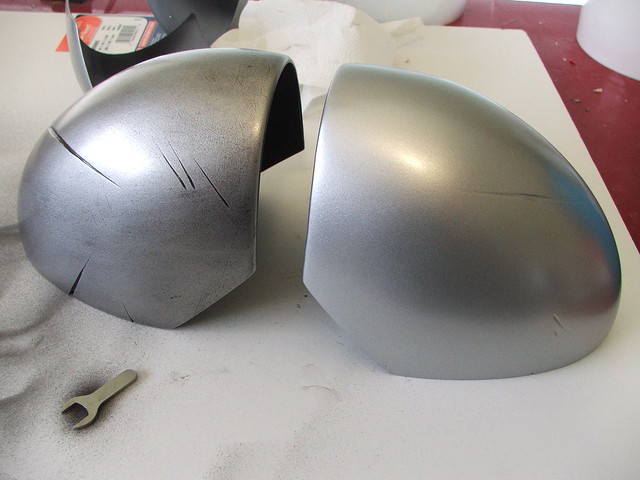
These parts were placed on my vacuumformer and pulled out of .10" styrene

The upper and lower pauldrons were pulled twice per side - each shape has an inner and an outer layer of .10" styrene to add thickness and rigidity to the shape.
Small machine screws were embedded along the inside of the larger pauldron, and the smaller ones affix to the inside with nuts. This allows them to pivot slightly and helps to increase movement.
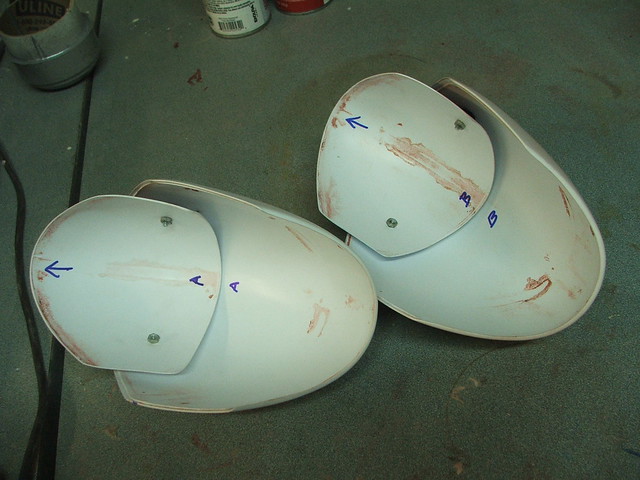
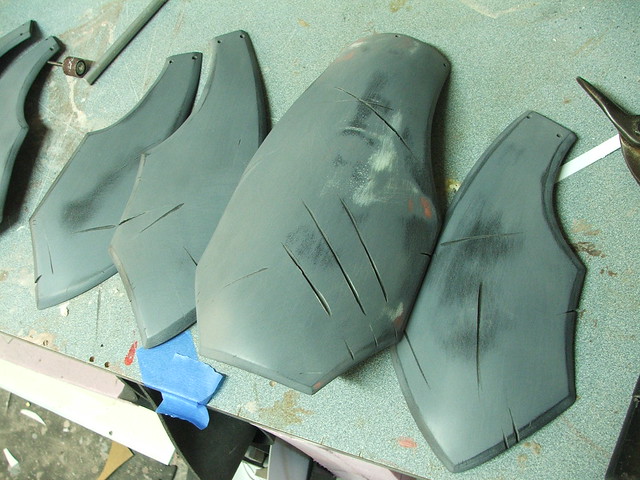
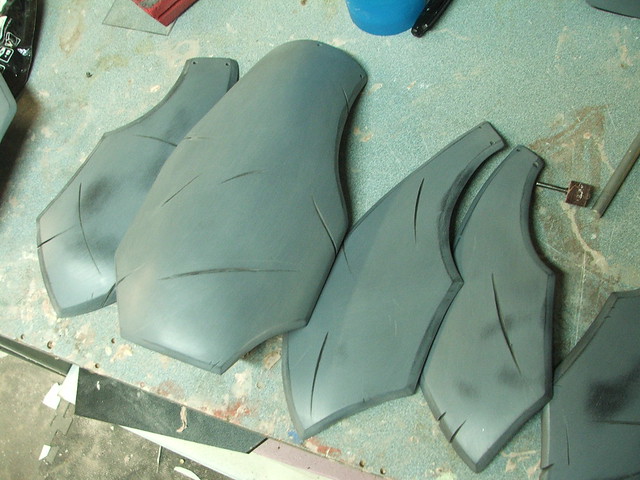
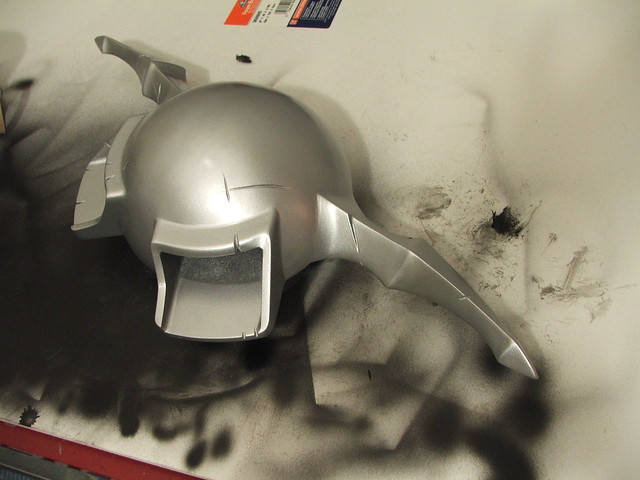
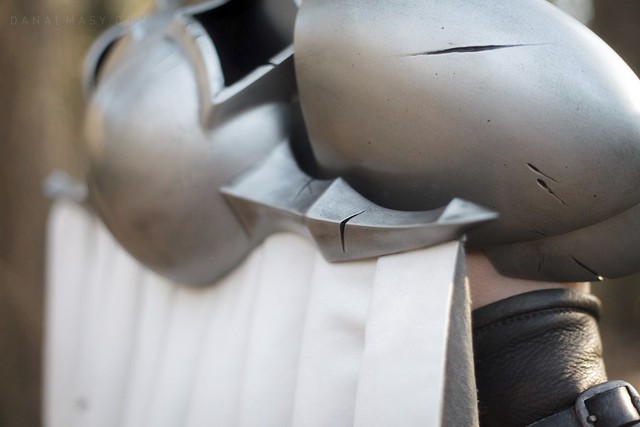
After a guide coat of primer, it was decided to add some damage to the armor. Clare is the "lowest ranked" Claymore in terms of her abilities, and in the anime series, she gets her ass kicked a lot. It only made sense her armor would take some pretty severe hits during her trials.
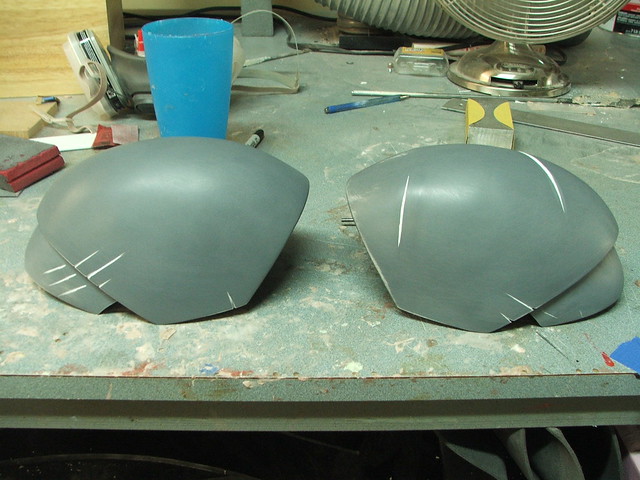
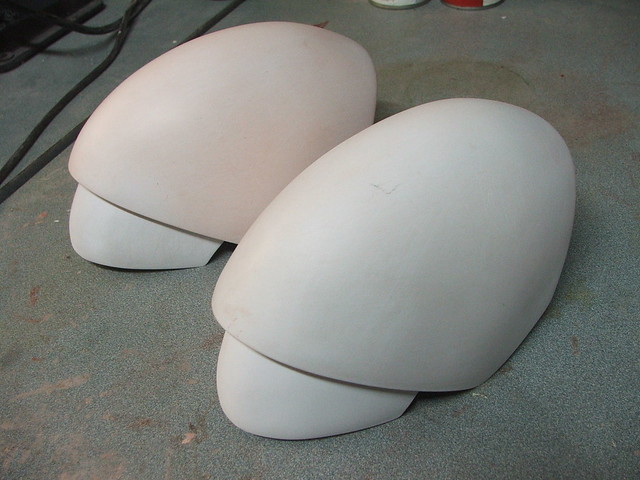
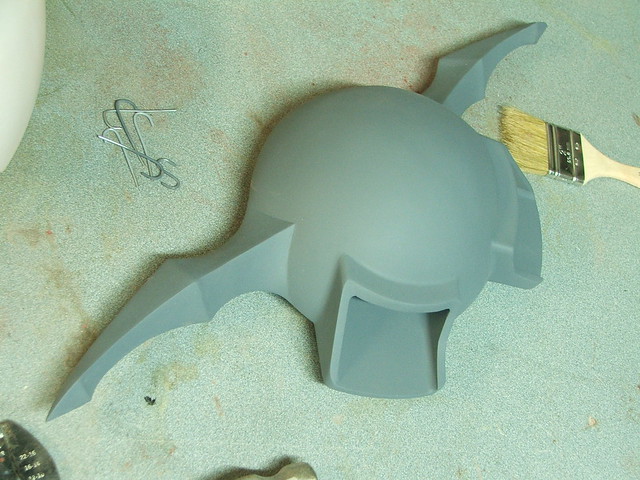
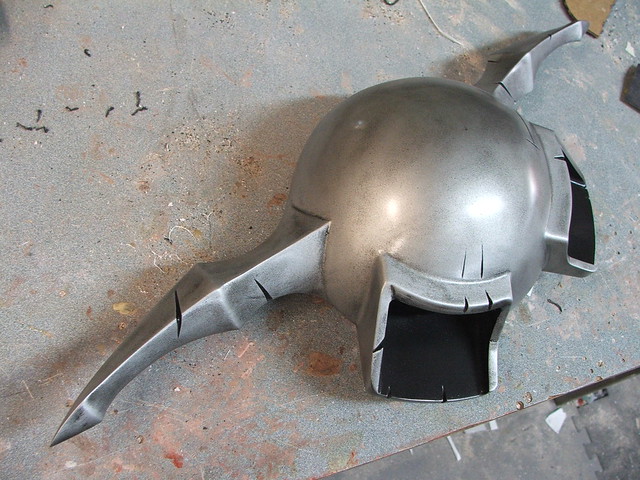
The dome part of the "backpack" thing was pulled in the same .10" styrene as the pauldrons. This was placed over a sheet of 1/4" sintra trimmed to the shape of the backpack perimeter. Since the weight of the cape would be hanging off the spiky wing sections on the backpack, it made sense to have the backing plate be one solid piece in order to be as rigid as possible.
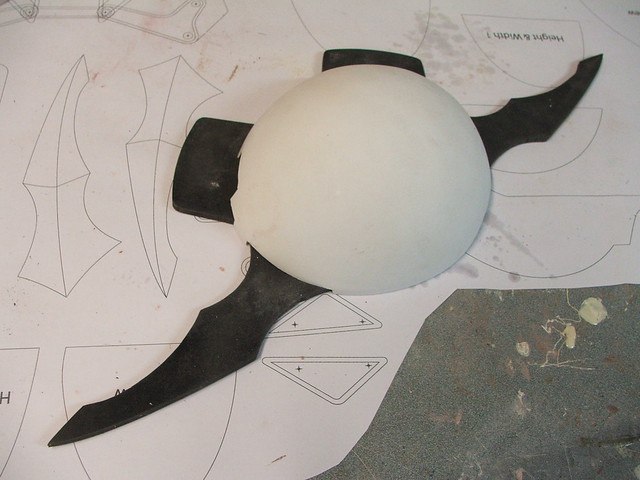
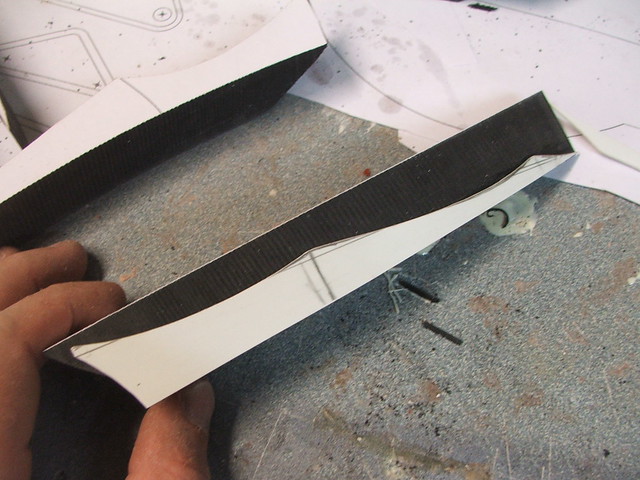
The wing sections were also cut from sintra, and started out as 1" thick parts. These were cut first on my bandsaw to give them a rough shape, then bisected along their center line.

After cutting the center line out, I added a thin styrene sheet between the halves to act as a guide for cutting the profile shape of the wings. After this was added, the two halves were glued back together around this part.
The sintra was rough sculpted into shape with a dremel tool using the center spine as a guide.

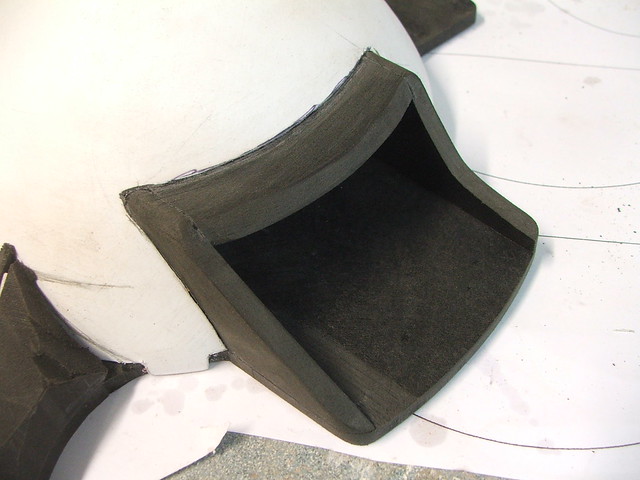
More sintra was used to make the sword carrier sections. While the actual Claymore blade I made won't fit in these recesses (damn you anime designers!) I do have plans to make a sword "blank" to fill this cavity in the future.
Lots and lots of filler and sanding later, we have a smooth pretty backpack. This got the same scars and scrapes as the pauldrons, don't worry! I don't have any pics of it handy, butt here are also 4 blind nuts embedded into the back plate in order to mount this to the costume later on.
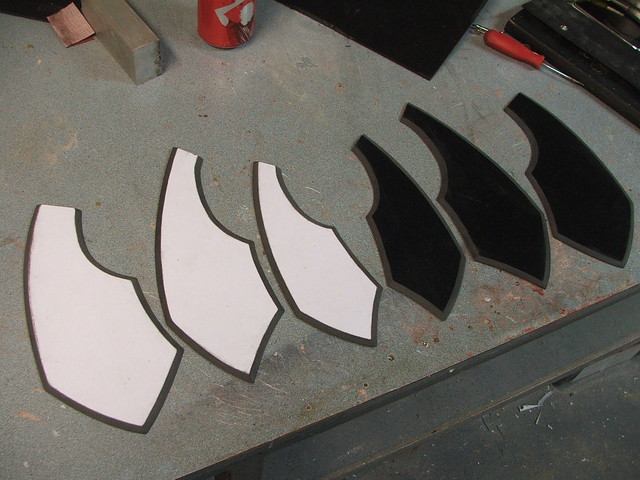
The "battle skirt" (as I came to call it) was made out of 1/4" sintra sheets. These were first trimmed to shape, then the edges were beveled by hand with a dremel tool.
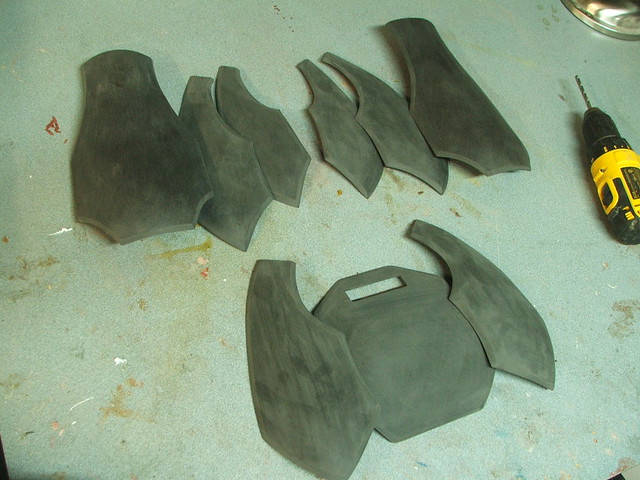
Sintra is a foamed sheet of PVC plastic, and it doesn't really like to take compound curves very well. A lot of work went into heating specific parts of the material, bending them to shape, re-heating, and repeating. There were several test fits to make sure the curve of each piece worked well with the parts next to it. The shot below shows the parts about halfway done with this process
After the curves were finalized, each piece was sanded to remove the texture of the sintra, then given a coat of primer and light filler where needed. These parts got a lot of damage and weathering, done mostly with a dremel tool and engraving chisel. The small holes at the top of the plates are for stitching into the Claymore top shirt part later.
Here's where we get into somewhat unfamiliar territory where I've just decided to wing it. If you've never seen a process like this before, its probably because I had no clue what I was doing and just felt like making it up as I went along. There are better ways to do things like the below, I'm sure, but since the project budget couldn't include pricier materials to do proper lifecasting, this seemed like a pretty good budget minded alternative.
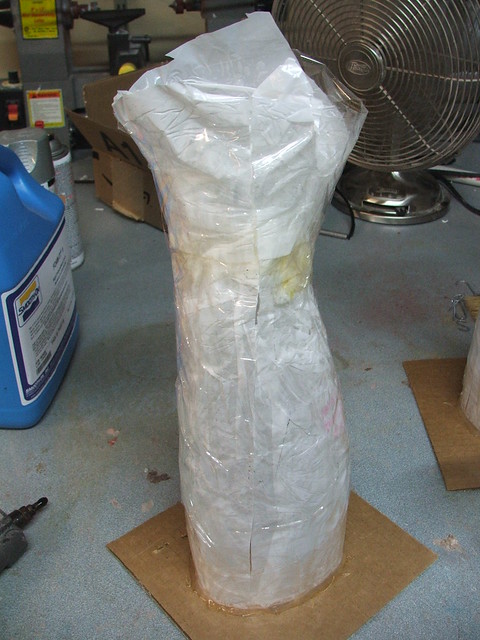
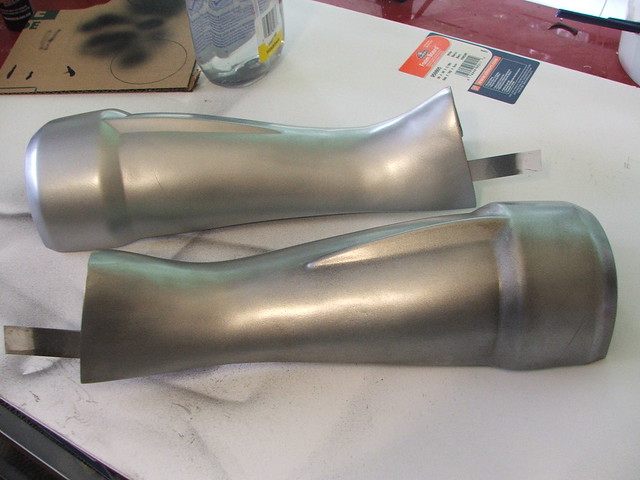
Claymores have 2-part greaves which cover their calf, shin, ankle and the upper part of their foot. I started off by making a set of packing tape molds of Cathy's legs. These started out as trashbags wrapped around the area to be molded, then wrapped tightly with tape and cut along a seam when finished.
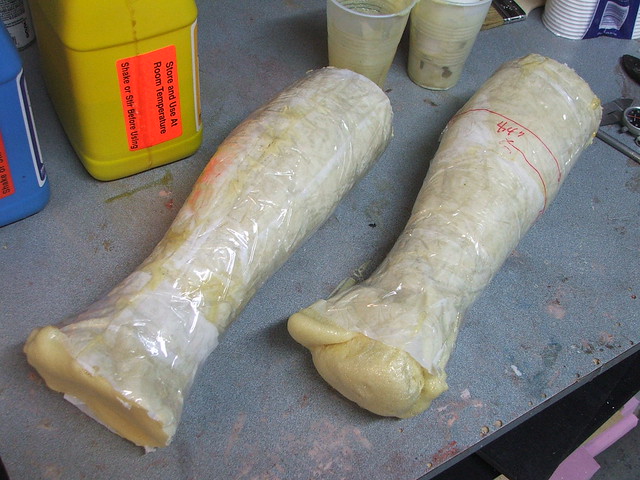
After taping the seam back together, these were filled with 2-part expanding foam to make a rigid copy of the leg forms.
After removing the tape, I skimmed the outer sections of the foam with bondo to make a smooth surface the same shape as the greaves.
There's a large cuff at the top of each of the greaves, which has a long spike leading up to it. In order to make sure I had a uniform shape and thickness around the entire perimeter of the leg, I cut strips of sintra out and glued them to the bondo around a mark on the upper part of the calf. The gaps between the strips were blended in with bondo.

The upper bevel of the cuff was added with apoxie sculpt, and the long pointed accent on the shin and calf was put in with apoxie as well.
These parts were cut in half on a bandsaw, then glued to 1/2" MDF risers in order to make vacuumforming bucks. In the shot below, you can see a proof-of-theory pull from some thin sheet I had laying around.
The completed master, next to a part pulled from .10" styrene!
The last task for my vacformer was to make the wrist cuff. This was lathed out of some laminated sheets of MDF then pulled in .10" styrene and glued into one part. Shockingly, Cathy's hand fits through this tiny part with room to spare!
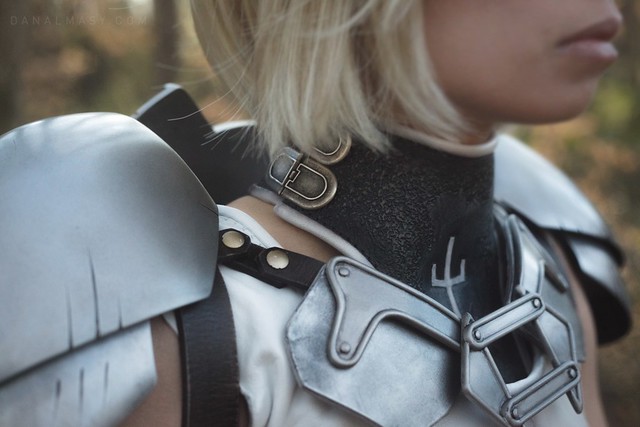
At some point I started to get behind on deadlines, and my documentation suffered a bit as a consequence. These clasp parts over the chest are an assemblage of styrene sheet and half round styrene bar stock. Aside from this, I don't have any shots of their creation. Sorry!
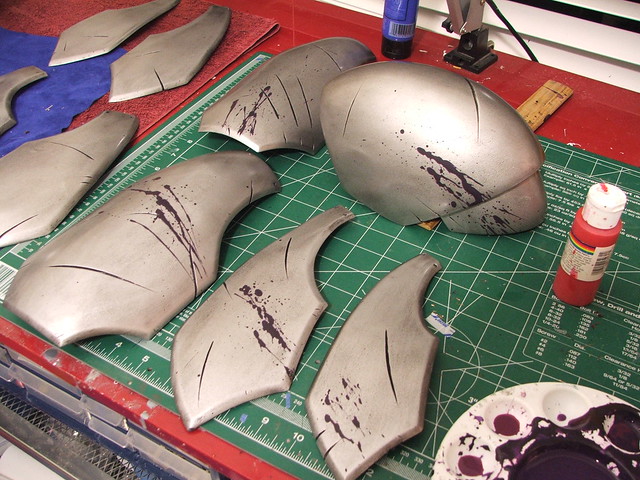
After everything was primed and prepped (my preferred method is going over the primer with a 320 grit sanding sponge and diluted surface cleaner like windex) each part got a topcoat of silver before weathering.
Weathering these parts made a huge difference in their realism! I used airbrushed acrylics, then topcoated each part with gloss clear in order to seal in the "grit and grime."
The two shots below show the difference between a fresh coat of paint and a weathered surface. The differences in parts like the greaves are subtle, but it really helps the overall look, in my opinion.
The greave and boot parts on one of the shoes for a mockup. After I gave these parts to Cathy, they got a velcro strip along the inside edge to keep them together and hide the side seam a little better than in this pic.

The final bit of weathering was the spattering of Yoma blood on a few various parts of armor. The blood itself is done in acrylics, and like the rest of the weathering, sealed under a coat of gloss clear.
The final pieces all assembled with Cathy's lovely costume work (see more of her stuff at God Save The Queen Fashions!) and shot by our friend and awesome photographer, Dan Almasy:

Details!

Really wish I'd gotten a shot of this part being made. Another vacformed part - the hand armor!

Along with the weathering on the armor, I also helped out Cathy by adding some blood spattering and weathered grime to her cape. Remember: dirt adds realism.
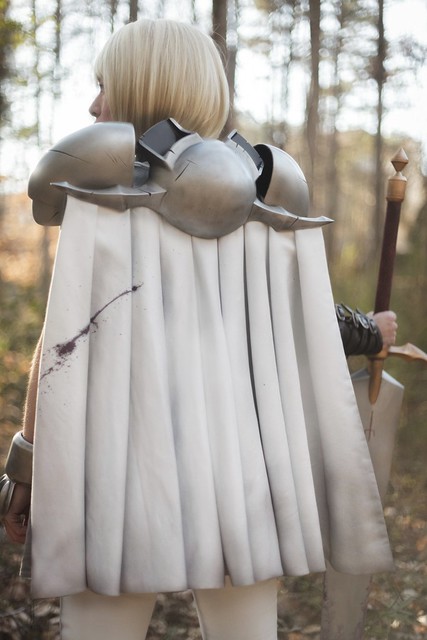
My favorite shot from the whole shoot, Cathy looks like a badass here.

The middle blueprint above shows some dome-shaped parts. These were profile and front views used to pattern out the shapes of the shoulder armor and the backpack dome. Much in the same way my Daft Punk Thomas helmet took shape, the mold masters for these parts started out as MDF spines outlining the outer edges of the shapes.
The cavities in these blocks were filled with pink foam, sanded to shape, then skimmed over with bondo to smooth out the entire buck.
These parts were placed on my vacuumformer and pulled out of .10" styrene
The upper and lower pauldrons were pulled twice per side - each shape has an inner and an outer layer of .10" styrene to add thickness and rigidity to the shape.
Small machine screws were embedded along the inside of the larger pauldron, and the smaller ones affix to the inside with nuts. This allows them to pivot slightly and helps to increase movement.
After a guide coat of primer, it was decided to add some damage to the armor. Clare is the "lowest ranked" Claymore in terms of her abilities, and in the anime series, she gets her ass kicked a lot. It only made sense her armor would take some pretty severe hits during her trials.
The dome part of the "backpack" thing was pulled in the same .10" styrene as the pauldrons. This was placed over a sheet of 1/4" sintra trimmed to the shape of the backpack perimeter. Since the weight of the cape would be hanging off the spiky wing sections on the backpack, it made sense to have the backing plate be one solid piece in order to be as rigid as possible.
The wing sections were also cut from sintra, and started out as 1" thick parts. These were cut first on my bandsaw to give them a rough shape, then bisected along their center line.
After cutting the center line out, I added a thin styrene sheet between the halves to act as a guide for cutting the profile shape of the wings. After this was added, the two halves were glued back together around this part.
The sintra was rough sculpted into shape with a dremel tool using the center spine as a guide.
More sintra was used to make the sword carrier sections. While the actual Claymore blade I made won't fit in these recesses (damn you anime designers!) I do have plans to make a sword "blank" to fill this cavity in the future.
Lots and lots of filler and sanding later, we have a smooth pretty backpack. This got the same scars and scrapes as the pauldrons, don't worry! I don't have any pics of it handy, butt here are also 4 blind nuts embedded into the back plate in order to mount this to the costume later on.
The "battle skirt" (as I came to call it) was made out of 1/4" sintra sheets. These were first trimmed to shape, then the edges were beveled by hand with a dremel tool.
Sintra is a foamed sheet of PVC plastic, and it doesn't really like to take compound curves very well. A lot of work went into heating specific parts of the material, bending them to shape, re-heating, and repeating. There were several test fits to make sure the curve of each piece worked well with the parts next to it. The shot below shows the parts about halfway done with this process
After the curves were finalized, each piece was sanded to remove the texture of the sintra, then given a coat of primer and light filler where needed. These parts got a lot of damage and weathering, done mostly with a dremel tool and engraving chisel. The small holes at the top of the plates are for stitching into the Claymore top shirt part later.
Here's where we get into somewhat unfamiliar territory where I've just decided to wing it. If you've never seen a process like this before, its probably because I had no clue what I was doing and just felt like making it up as I went along. There are better ways to do things like the below, I'm sure, but since the project budget couldn't include pricier materials to do proper lifecasting, this seemed like a pretty good budget minded alternative.
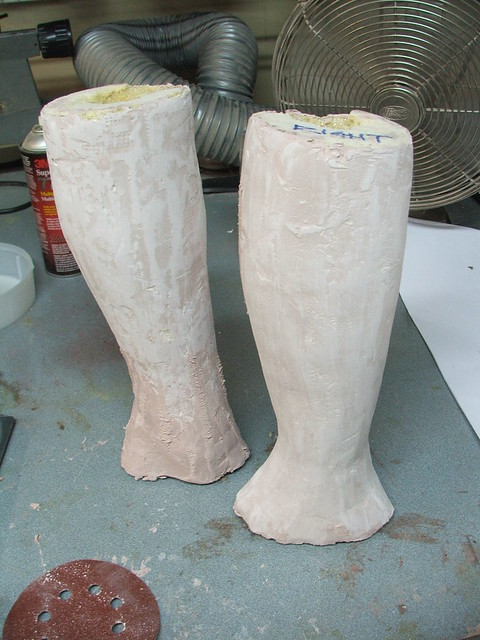
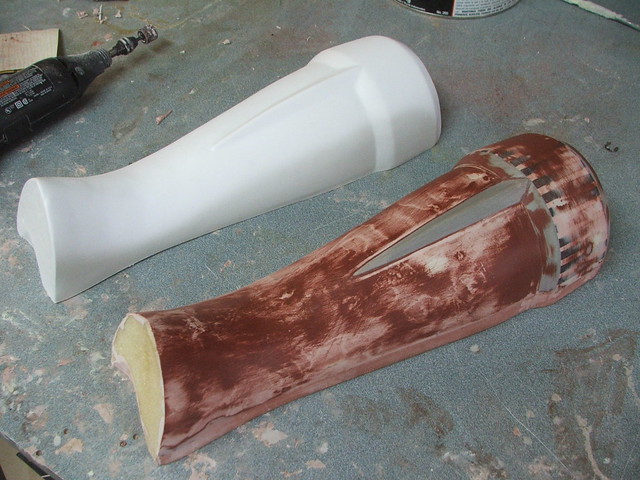
Claymores have 2-part greaves which cover their calf, shin, ankle and the upper part of their foot. I started off by making a set of packing tape molds of Cathy's legs. These started out as trashbags wrapped around the area to be molded, then wrapped tightly with tape and cut along a seam when finished.
After taping the seam back together, these were filled with 2-part expanding foam to make a rigid copy of the leg forms.
After removing the tape, I skimmed the outer sections of the foam with bondo to make a smooth surface the same shape as the greaves.
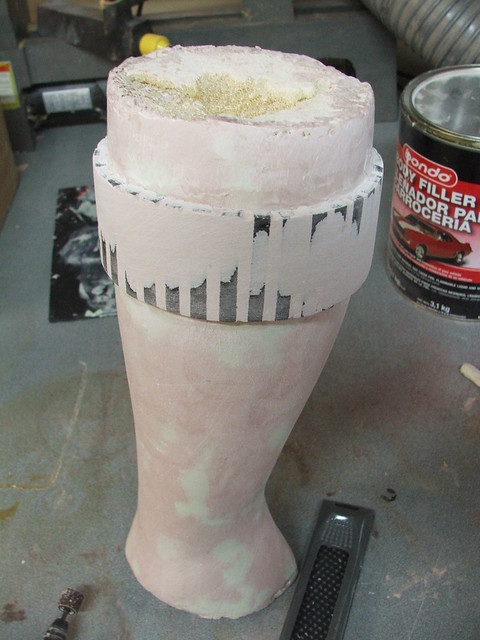
There's a large cuff at the top of each of the greaves, which has a long spike leading up to it. In order to make sure I had a uniform shape and thickness around the entire perimeter of the leg, I cut strips of sintra out and glued them to the bondo around a mark on the upper part of the calf. The gaps between the strips were blended in with bondo.
The upper bevel of the cuff was added with apoxie sculpt, and the long pointed accent on the shin and calf was put in with apoxie as well.
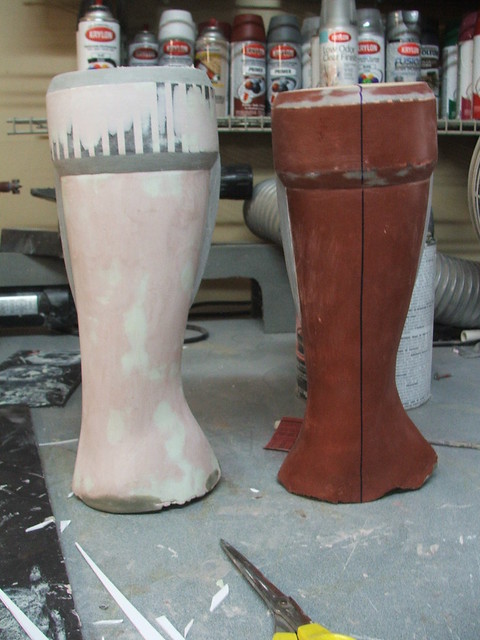
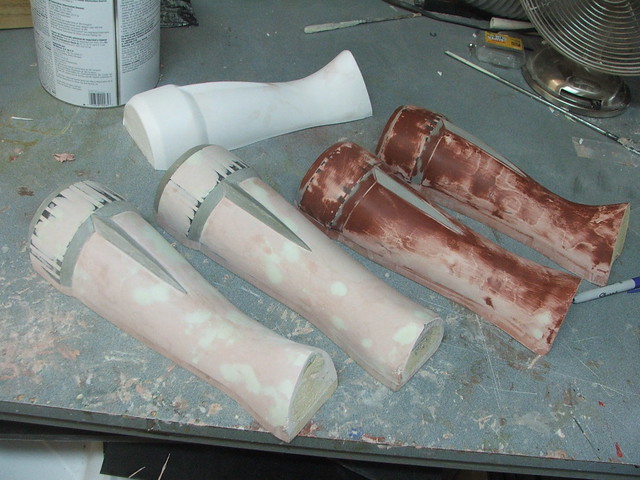
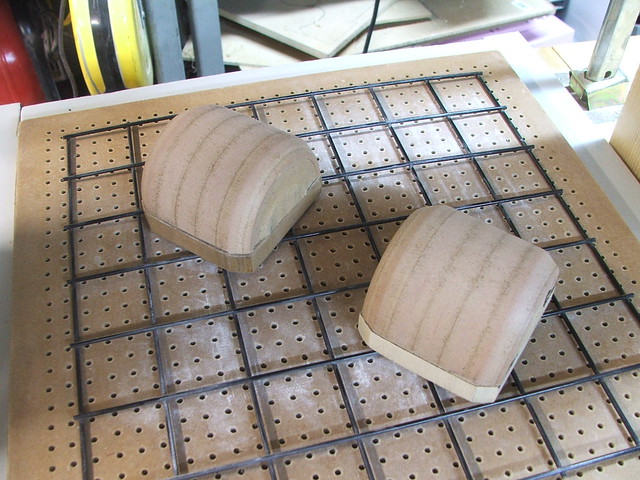
These parts were cut in half on a bandsaw, then glued to 1/2" MDF risers in order to make vacuumforming bucks. In the shot below, you can see a proof-of-theory pull from some thin sheet I had laying around.
The completed master, next to a part pulled from .10" styrene!
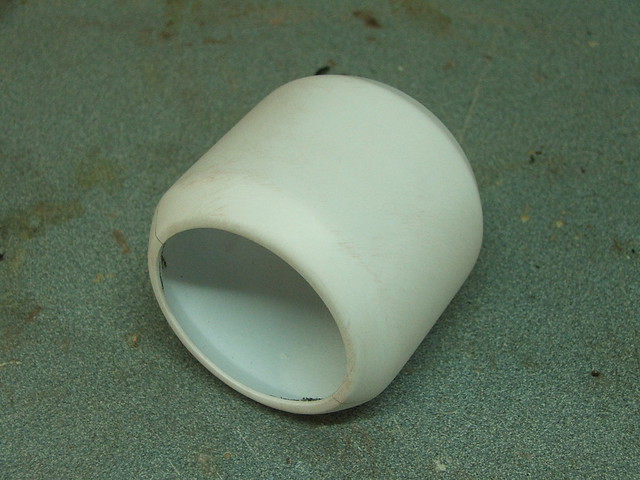
The last task for my vacformer was to make the wrist cuff. This was lathed out of some laminated sheets of MDF then pulled in .10" styrene and glued into one part. Shockingly, Cathy's hand fits through this tiny part with room to spare!
At some point I started to get behind on deadlines, and my documentation suffered a bit as a consequence. These clasp parts over the chest are an assemblage of styrene sheet and half round styrene bar stock. Aside from this, I don't have any shots of their creation. Sorry!
After everything was primed and prepped (my preferred method is going over the primer with a 320 grit sanding sponge and diluted surface cleaner like windex) each part got a topcoat of silver before weathering.
Weathering these parts made a huge difference in their realism! I used airbrushed acrylics, then topcoated each part with gloss clear in order to seal in the "grit and grime."
The two shots below show the difference between a fresh coat of paint and a weathered surface. The differences in parts like the greaves are subtle, but it really helps the overall look, in my opinion.
The greave and boot parts on one of the shoes for a mockup. After I gave these parts to Cathy, they got a velcro strip along the inside edge to keep them together and hide the side seam a little better than in this pic.
The final bit of weathering was the spattering of Yoma blood on a few various parts of armor. The blood itself is done in acrylics, and like the rest of the weathering, sealed under a coat of gloss clear.
The final pieces all assembled with Cathy's lovely costume work (see more of her stuff at God Save The Queen Fashions!) and shot by our friend and awesome photographer, Dan Almasy:
Details!
Really wish I'd gotten a shot of this part being made. Another vacformed part - the hand armor!
Along with the weathering on the armor, I also helped out Cathy by adding some blood spattering and weathered grime to her cape. Remember: dirt adds realism.
My favorite shot from the whole shoot, Cathy looks like a badass here.
More pics of the process available (and in higher resolution!) on my Flickr. As always, thanks for reading!
7 comments:
That is one incredible collaboration, I really loved her addition of the leather arm wrap from the series. What a team !
Thanks for the pics. Seeing the process is always amazing, and the result is no less than that as well.
coooooolllll
Love it! your creations are splendid !
But the colour of the armor is you know, like chromed, not grey :p
YOU did an absolutely great job of bringing the CLAYMORE to life - if there were a real life movie - this would it!!!
I love Claymore - and was wondering if someone was going to sit down and do this armor - the rest of the costume and your friend was outstanding!!!
WOW!
In a first time, excuse me for my bad English (I'm French). But I have to oblige to write these some sentences to say to you that your creations are splendid/amazing.
Good continuation.
respect from France
do you think you could make me this armor & sword but without the skirt? i would pay a nice amount for it
Post a Comment