
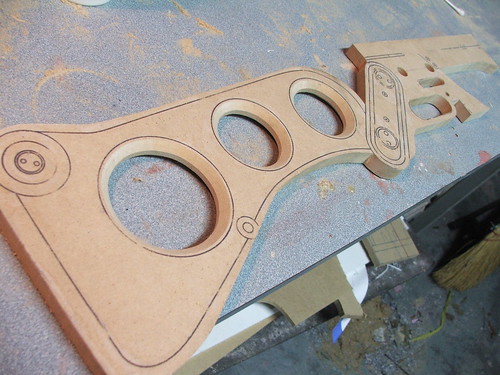
The basic steps at the beginning were the same as my last build. Make a blueprint, transcribe it to wood, and start cutting, gluing and clamping.

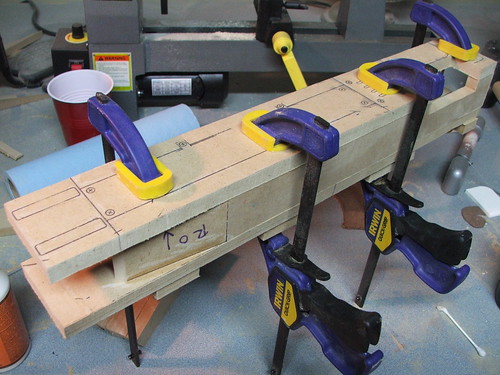
I did discover a random and somewhat neat trick for scribing the lines on this though. By printing to vellum on an injket printer, I was able to directly transfer the pattern of the print from the paper to the wood. Using laquer thinner brushed over the ink, I burnished the paper against the MDF and the lines transferred perfectly! Made transcribing my blueprints MUCH easier.
The main difference between this build and my last is the materials used. Outside of the stock base, barrel, grip and MF cell, all other parts were made from sintra, styrene, or aluminum. These materials can take detail much better than MDF which afforded me a lot of control in making the shape more accurate.
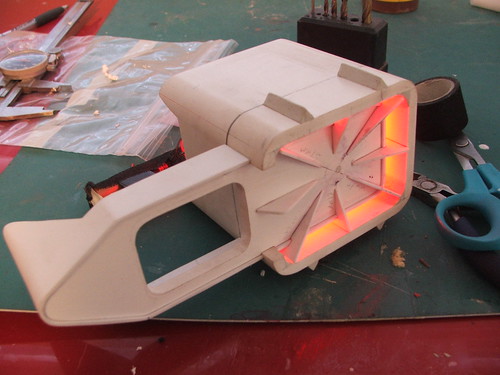
I also decided to use LEDs for a glowing barrel effect. This was a preliminary test-fire to see how the idea would work. In the end, I used the lens out of a laser pointer behind the center hole in the barrel to focus the light and make it brighter in that spot.
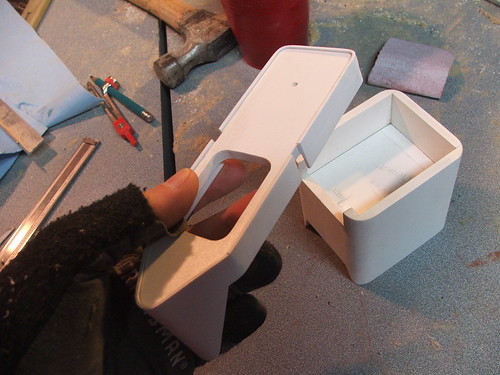
After the barrel and stock were shaped to the correct dimensions, I started adding details in sintra & styrene. The rounded edges on the back and front parts were made by gluing the sintra into a box and rounding the edges on my table router.

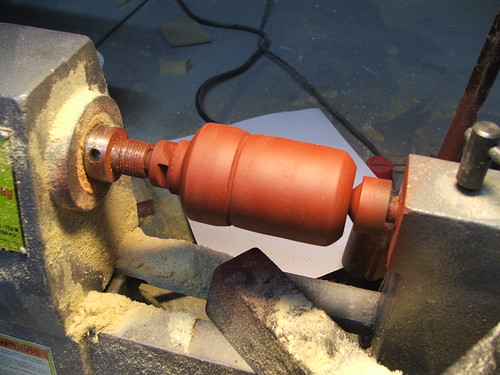
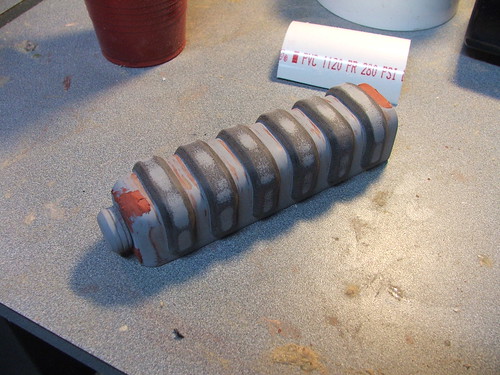
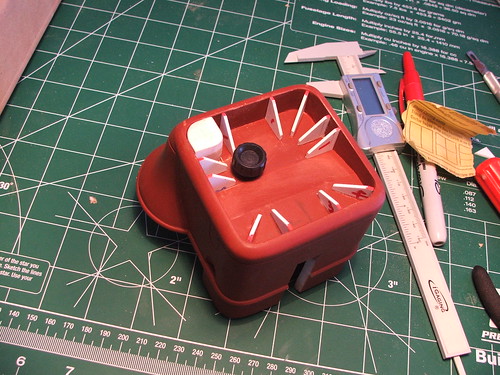
Another huge difference in this build was my new lathe. The AER9 has a TON of little rounded bits all over it. These were cut out of MDF or sintra. The microfusion cell is 4 pieces of MDF glued together and shaped on the lathe as well.
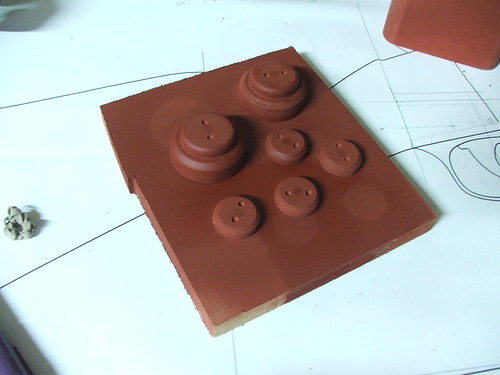
This rear knob is also lathed MDF. The tube which sits on top of the barrel is an ABS rod. This was a lot easier to shape than the 5/16" steel tube I used on the last build.
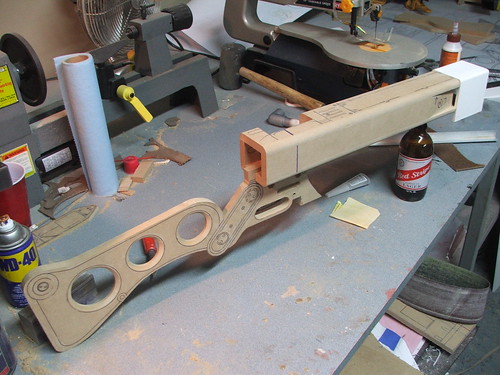
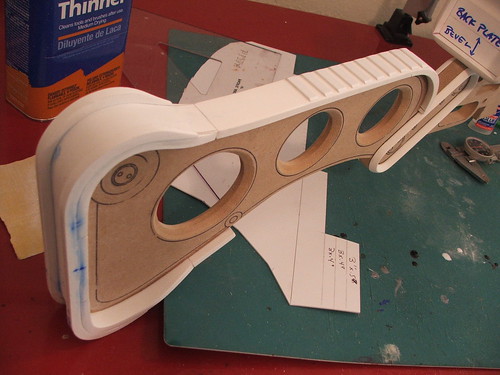
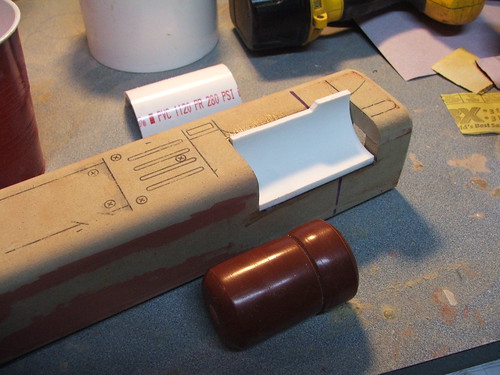
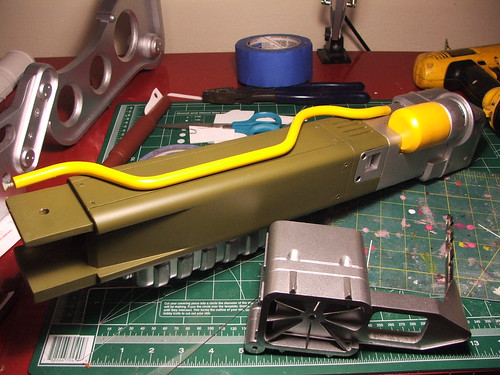
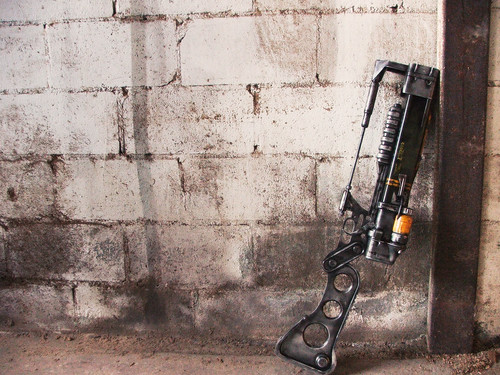
Here's most of the parts going on for a test fit.
The grip is an MDF block with sintra strips shaped over it. To keep a uniform shape, I heat-formed one sheet over the entire grip, then cut it into strips on my bandsaw.
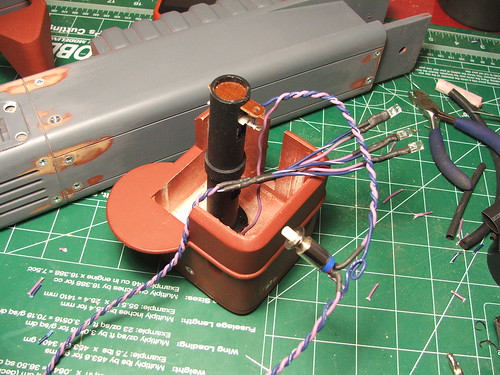
The rear of the barrel is a sintra box with styrene accents. The curved part behind the MF cell was sculpted out of apoxie sculpt and sanded to shape.
Various other smaller bits were shaped out of sintra/styrene before going to primer. Below is the trigger & trigger arm, MF cell area, barrel, cell eject lever, and other bits. I also scribed the panel lines on the parts with a lino block carving tool I had left over from my art school days.

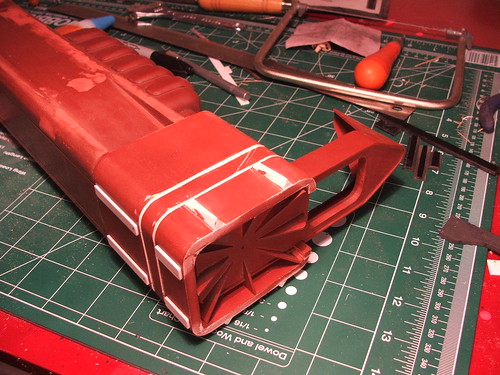
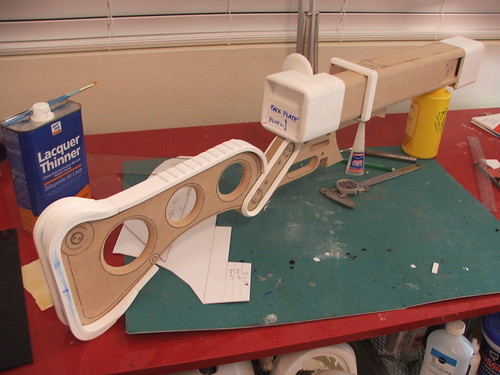
Another test assembly after all the parts had been primed. I had some really tight tolerances when putting it together, as the layers of paint actually made it quite hard to get the front and rear casings over the barrel. Yay precision!

To power the LEDs, I used 2 AA batteries housed in an in-line battery holder. The knob on the back of the gun unscrews to reveal the battery door to replace the cells. I was very very happy with how this turned out. The LEDs are switched on and off by a hidden pushbutton switch on the bottom of the rifle barrel.
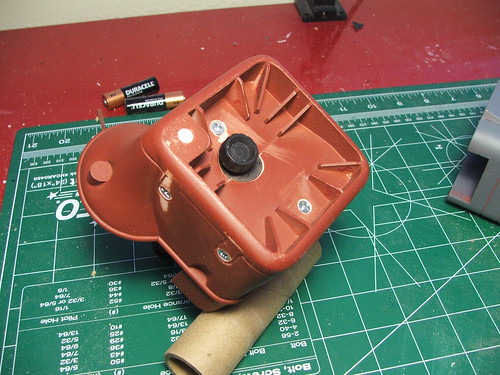

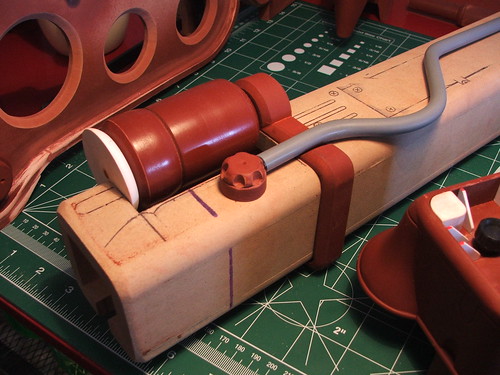
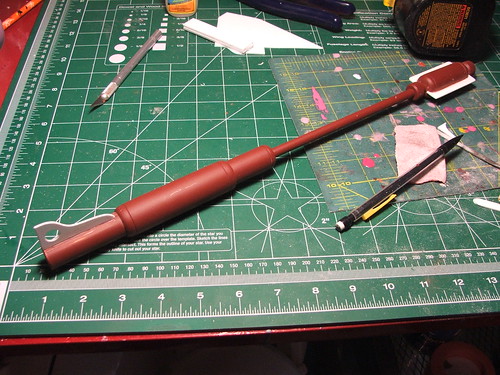
The last lathed part was the bottom support bar. This was carved from a pine dowel and cored out to receive a hollow aluminum bar. Styrene accents finished it off. I also found some knurled nuts to use for the two circular parts on the support bar and JB welded them in place.
On to paint!
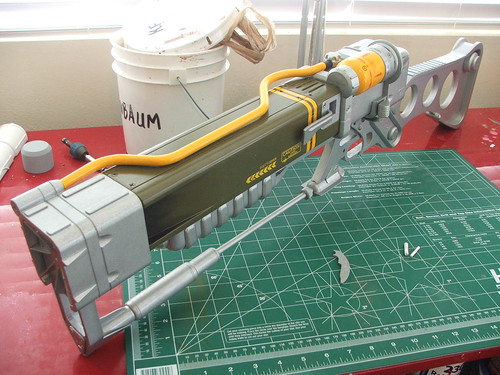
The basecoat silver was done with Krylon chrome paint. After this, I dusted the surface with a darker silver by holding the can about 2 feet away from the part and spraying lightly over the entire surface. This gave the paint a stippled texture like cast aluminum would have (this is shown a little better on the front barrel casing in the shot below with the barrel painted green.)
Color was done with Testors spray paint for the barrel (which is annoyingly thin and loves to run) and Testors brush paint for the silver on the MF cell and upper pipe.
After this, each individual part got a coat of clear to protect the finish.
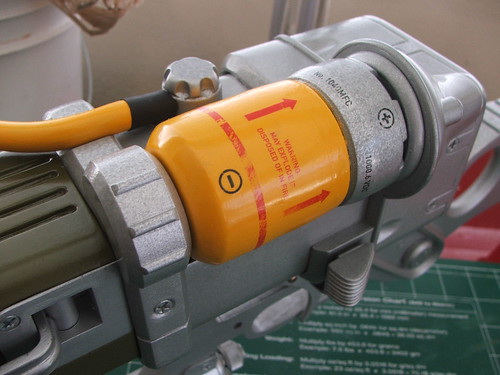
I know I'm going to get a ton of decal questions, so I hope this answers them preemptively. It seems like custom decals are the bane of every replica maker, and it took me a bit to figure out the best way to do it as well. As with my Portal Gun, the AER9 got water-slide decals on the MF cell for the warning messages, arrows, and stripe. These were designed in Adobe Photoshop and printed onto water-slide decal paper on a laserjet printer.

The barrel decals were done differently. The barrel was scanned on a computer scanner to pick up the color & texture of the paint. Then, I designed the side decals in Illustrator, taking them into Photoshop to layer them over the green background and weather them a bit before printing. These were output on adhesive-backed vinyl using a plotter, then applied to the gun. There is a slight seam line around the sides of these, but its only evident under close inspection.
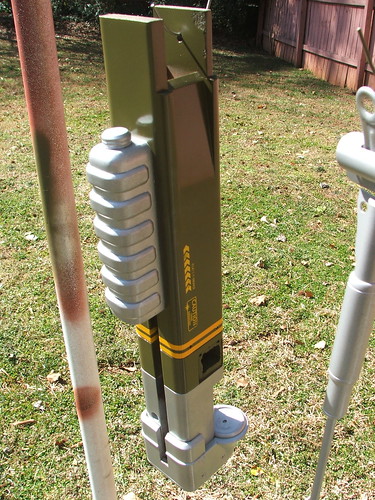
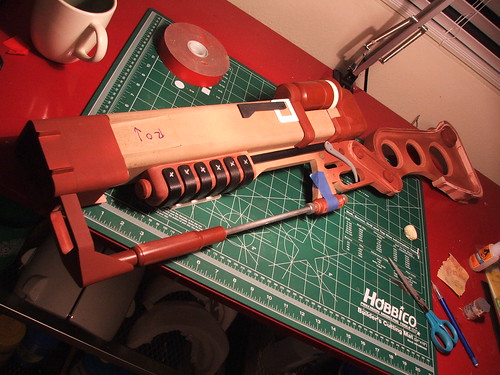
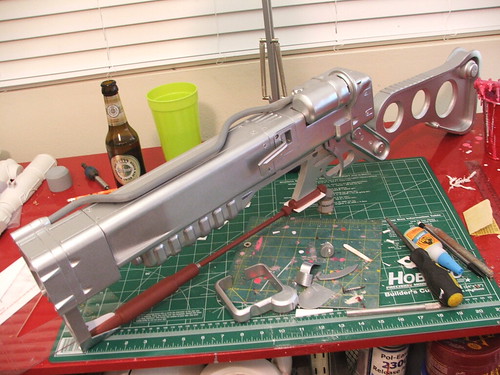
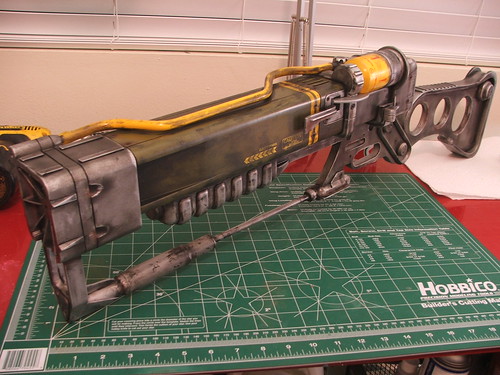
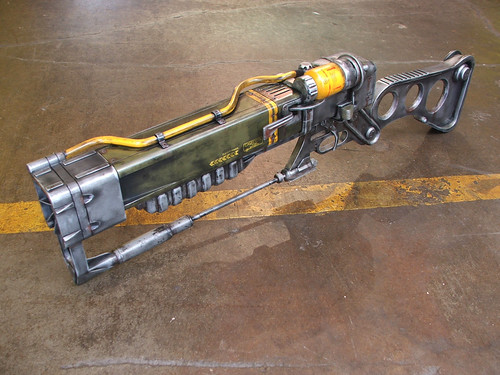
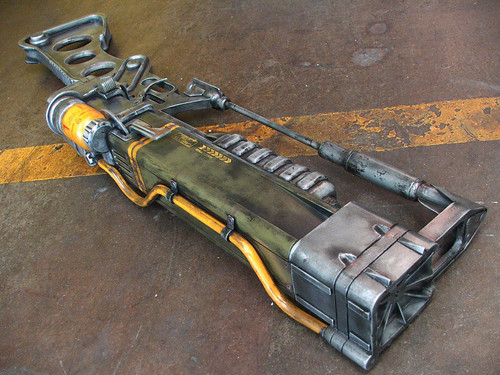
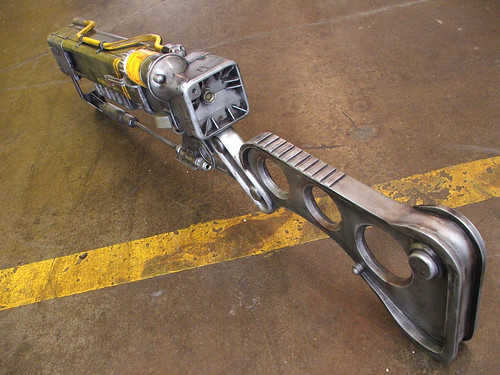
Here's the gun all assembled and shiny brand-new! So pretty, so clean...

So needs a few coats of grime.
This was the first pass. Another new tool I had for this build was an airbrush. I'd never used one before, so this was as much a practice run as it was a weathering effort. It took some getting used to, but I was very satisfied with the results.
NOTE: If you don't seal inkjet decals before acrylic paint weathering, they will run & bleed! This is why I clearcoated the gun before this process.
I also made a display board for the gun to sit on, in maple. This was stained satin black.

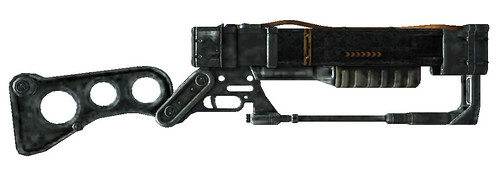
Here's the final shots of the gun after all the weathering was completed and given another coat of clear to protect the finish. I am very glad I got to revisit this piece, but I don't think I'll be making another one. 2 was plenty for me, and its time to try another project with my newfound techniques and materials.


These pics and more build images are all available on my flickr page, in much higher resolutions. Thanks for reading!
28 comments:
Wow. That is some incredible work. I'm completely jealous of your ability with the weathering.
sweet jeebus, that looks amazing! Thanks for sharing the build...I'll steal some of your ideas as I work on the Alien Blaster.
WWWAOOOOO!!!! Great great great job! It's been a while since you posted something new, I came almost everyday to check for new images! Thanks for so much generosity! I'm starting to make props myself and I must say I have to struggle not to discourage myself when I see your results! Wow again!!! - Philippe/"Cortex Fast-Food", Switzerland.
I could say it looked great, but you wouldn't be getting the whole feel of how awesome it looks to me.
I CREAMED MYSELF.
better?
Your previous projects inspired me to make this, the Shishkebab not the girl, it's not quite as accurate as most would like plus it doesn't flame up.
http://www.flickr.com/photos/copirate/4320655633/in/set-72157623324645562/
I don't make props but I really enjoy the process and detail in what you do. Thanks for posting another 'how I' series. Its like looking over the artists shoulder while he's working!
Cheers
Kym
what kind of clear coat do you use? Flat or glossy? I used flat and it made my metal paint loose it's shine. I used glossy and it made my prop look like plastic.
I used Satin clearcoat on the gun. If you're using metallic (chrome) paint, clearcoat typically makes it look like dull gray. I've never found a way to counter-act this.
Ahh I am using chrome paint. I'll have to experiment with different paints then. Thanks for the tip!
ok that's completely beautiful. have you ever thought of making a complete "video game arsenaL" of all the hardest to replicate/ your favorite video game weapons?
i know you said you would not make any more laser rifles but i would probably buy one if you made the tri beam or the scoped one from new vegas. thay would be pretty awesome to make
I know everyone is saying they would buy this rifle cause of how cool it is and I can't contest I agree you make masterpieces! I love your Big Daddy outfit by far a *David* of art work for Cos Play! But I'm here asking if I could buy the rifle from you or commission you to make a weapon of Fallout 3 as I am making my Lone wanderer costume and would love a masterpiece gun to accompany me to conventions! I know you're booked right now but when you are free I'd like to give you a challenge for some replicas if you're interested! I have tons of *Caps* to pay with! ;)
I think you should also do a fallout 3 fat man and the dg-2 wunderwaffe from call of duty :world at war nazi zombies
Maybe instead of a led you could of used one of those burning laser pointers
Beautiful work. One quick correction. No one "lathes" or "lathed" or "is lathing" anything because lathe is a noun not a verb. The correct verb would be "turn" or "turned" or "is turning". Believe me, my little grammar correction is not meant to detract in any way from your awesome skills. Just thought that if you are a perfectionist you might wanna extend the perfection to the grammar side as well.
heyy
i want to build this my self as well
and i was wondering whats the length of the gun?
damn that was a nice build bro how much would one of those cost?
Hey there,
I LOVE the work you do, and the Laser Rifle is just a favourite if you like the Fallout games.
Is there any chance you're sending people blueprints or something? I'd like to give this one a shot in my free time.
greetz from Belgium !
WHY ARE YOU SO GOOD AT MAKING THESE VIDEO GAME PROPS?!
Is it your rifle wich hangs on the wall in Bethesda game studios? because in this http://www.gameinformer.com/b/news/archive/2011/01/10/video-behind-the-scenes-of-skyrim.aspx interview todd says something about this rifle prop
You should try to make a replica of ED-E from Fallout New Vegas!
oh lalala awesome
Wow, this came out so much better than the last. The decals, the level of detail in the paint, and it just seemed like you had enough time to carefully make it a more precise replica. Really really cool.
Is this the final product? http://www.youtube.com/watch?v=D8UmVUXpfEE#t=51s
Not my collor of barrel, but epic.
Absolutely amazing job, you are very talented person!
I know many others have said this before but --
I WANT ONE!
I'd love to know how much you'd charge for this as a commission.
This is awesome! The day I saw your work I started building my own laser rifle. I'm nearly done with the building and I'm gonna start the paint soon. Great job. I will post pictures on google as soon as its done, look for "rad zomby laser rifle"
Post a Comment