
Before I get into the "how-I-did-it" thing, some credit is due to fantastic artisans who assisted in helping me bring this project to light. Below you'll find each specialist's web page, and I can say their work is of the absolute highest caliber.
Coding for this helmet (Arduino and iOS) was handled by James Moss
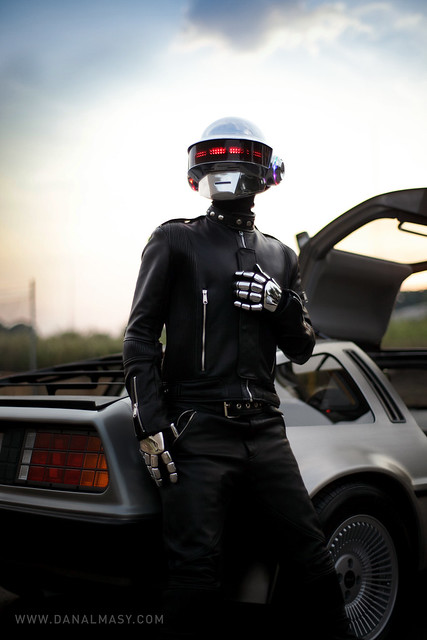
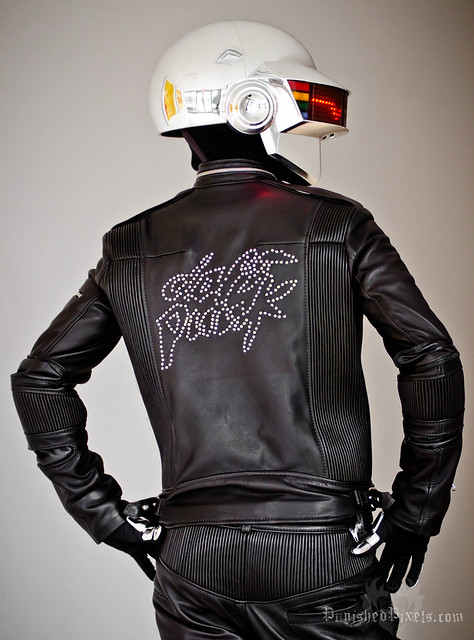
The Daft Punk leather suit, which you see below, was fabricated by Catherine Jones of God Save The Queen Fashions
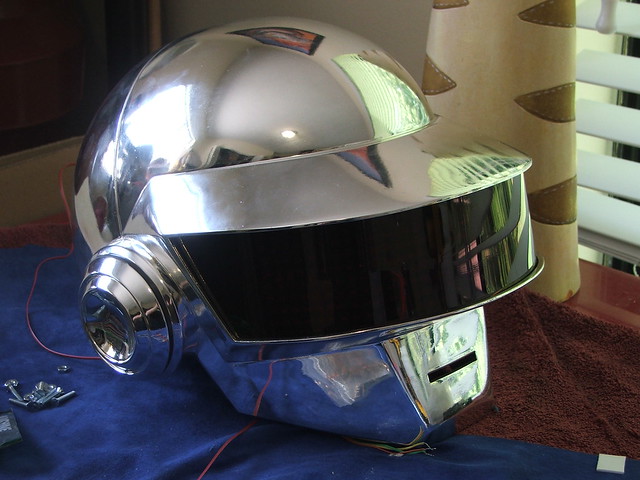
Chroming of the helmet and gloves was handled by Creations n' Chrome
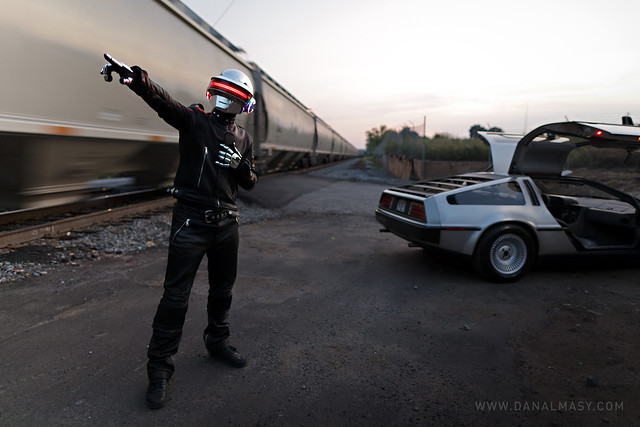
2 photographs below and the last on this page, courtesy of Dan Almasy
Custom circuit board printing was handled by Batch PCB.com
Awesome DeLorean provided for the photoshoot by Derek Lukaschus
If you're just arriving on this page, please be sure to visit parts one and two of this build, which showcase the sculpting and moldmaking aspects of the project.
Don't feel like reading? You're in luck! 4 months go by in 3 and a half minutes:
And, if you'd rather just see more pretty pictures like the ones below and skip all the sawdust and soldering, feel free to hit this link to see more fancy photowork.

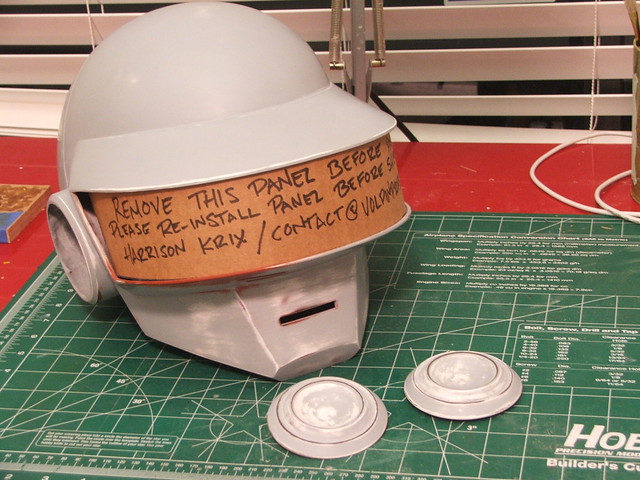
Onto the build! The last time I had an update on the project, the mold had been finalized and I had one prepped polyester resin casting heading out for chrome work.
While this was out at Creations n Chrome, I got to work on the visor LED matrix. To check for some semblance of visibility, I made a mockup printed on transparency film of where the LEDs and wire traces would be situated. Nothing exact, but good enough for a proof-of-theory.
Vision was adequate, which was very encouraging!
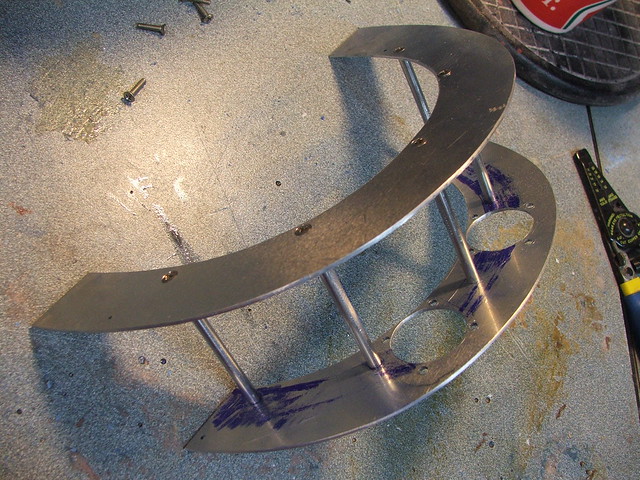
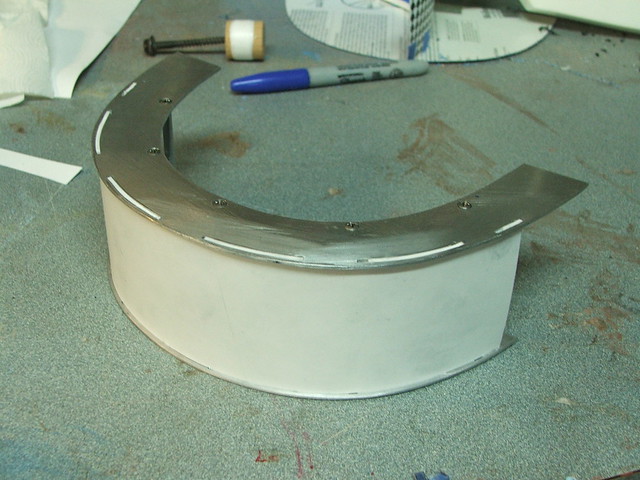
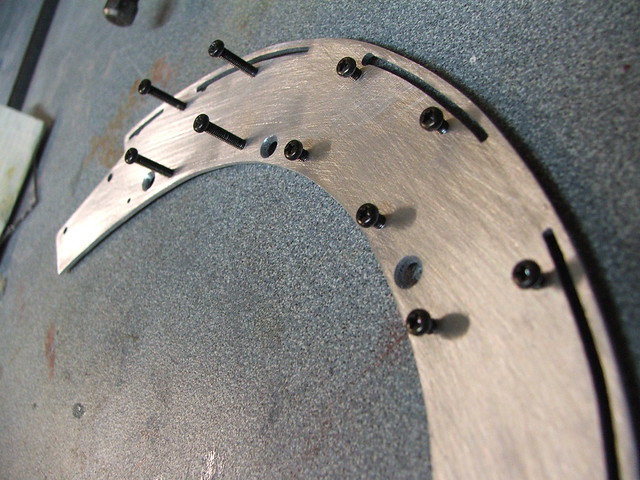
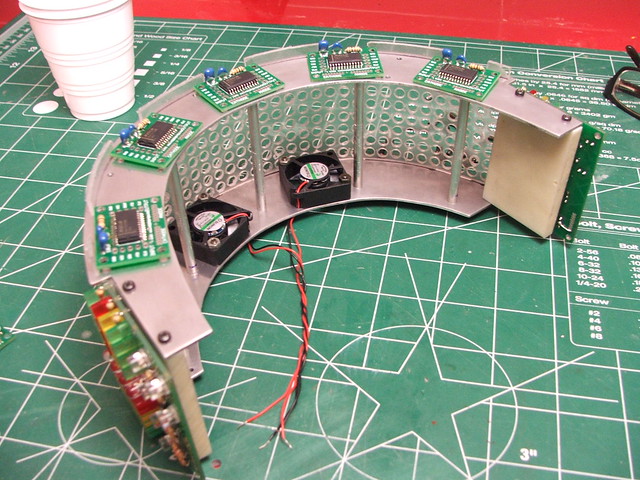
I decided the actual structure to hold the matrix in place would be built from 2 sections of 1/16" aluminum plate, with the drilled-out subvisor tension-fit between them. Below was the start of all that ambition.

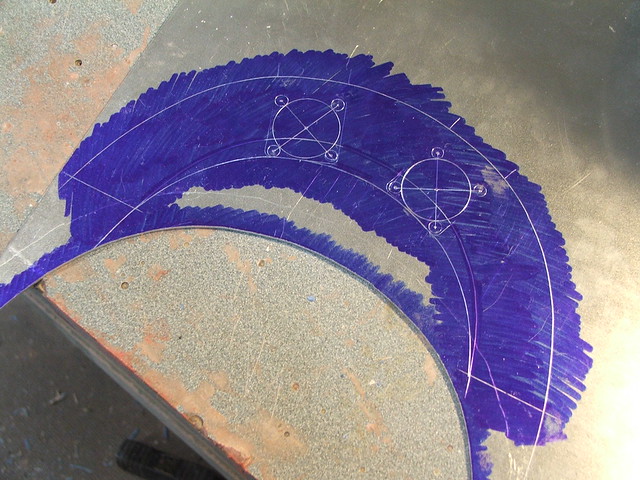
After scribing all the lines, the plates were cut on a scrollsaw. The two large holes in the plate are where two vent fans are situated, which pull fresh air in through the lower nose vents on the underside of the visor. I can't say enough how much these saved my live when wearing the helmet, especially in the Atlanta heat in summer.
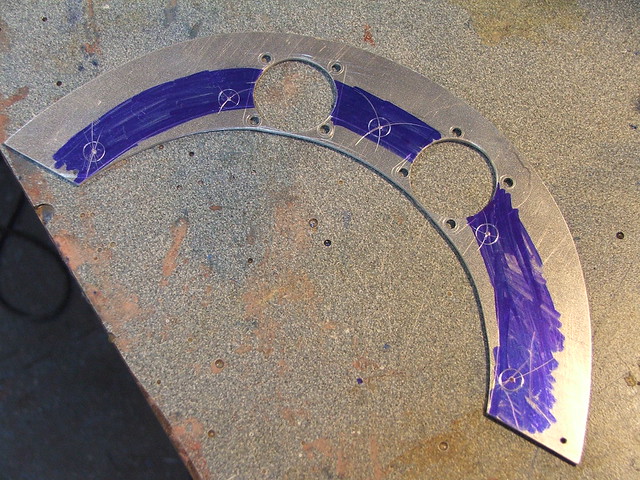
Uprights were cut from 3/16" aluminum hollow tube, and tapped to accept a machine screw. 5 of these hold the plated parallel to one another.
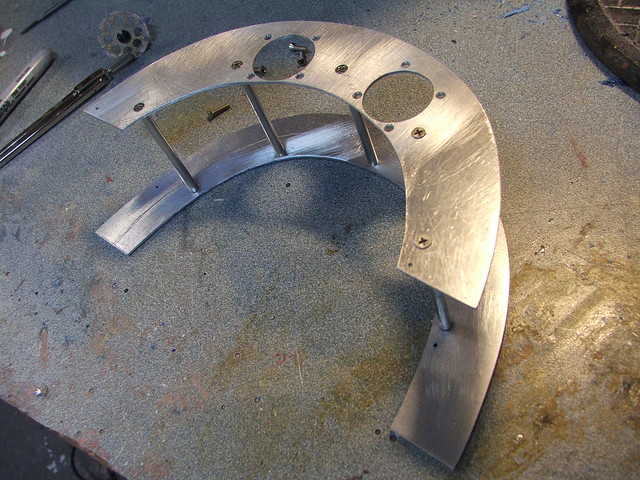
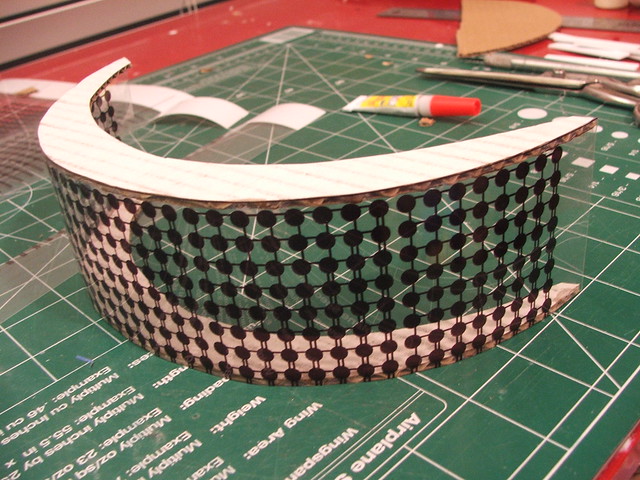
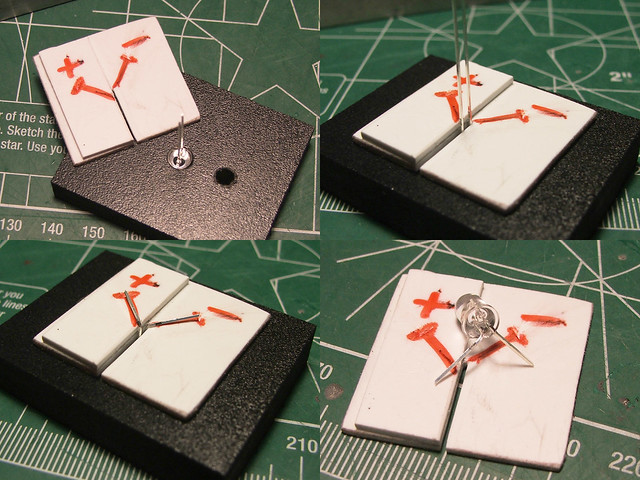
This styrene plate was the mockup for the subvisor. You can see the tabs on the top which align with cutouts on the mounting plates. This has a double feature of keeping the subvisor bent on a gradual curve as well as keeping the entire thing in place without the need for any glue joints.

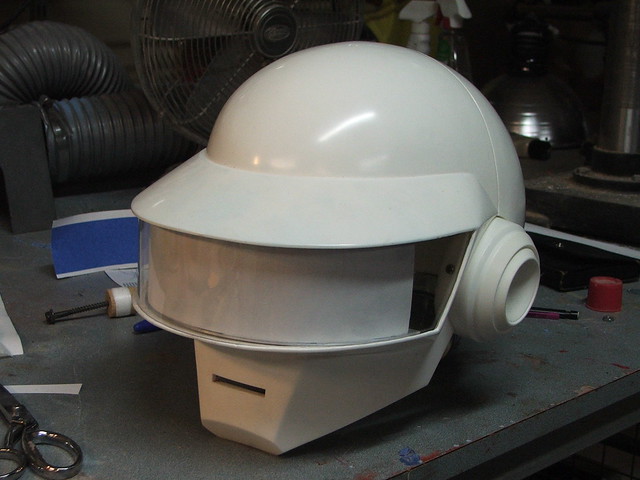
Quick test with my mockup helmet to make sure everything fits!
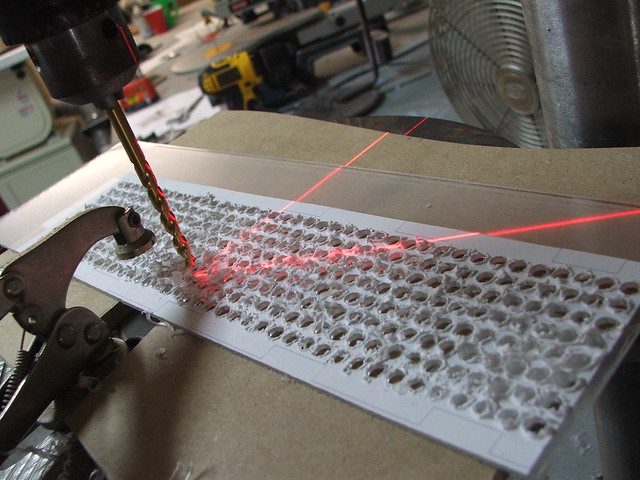
Then came the drilling... All the holes for the subvisor were drilled by hand on my drill press. The material used was .060" PET plastic.

More mounting points were drilled and tapped into the subvisor frame to allow for the circuit boards to be mounted later. If you go this route, make sure to insulate your boards against the aluminum to prevent dead shorts and the dreaded blue smoke.
And then I polished them. Because, why not?
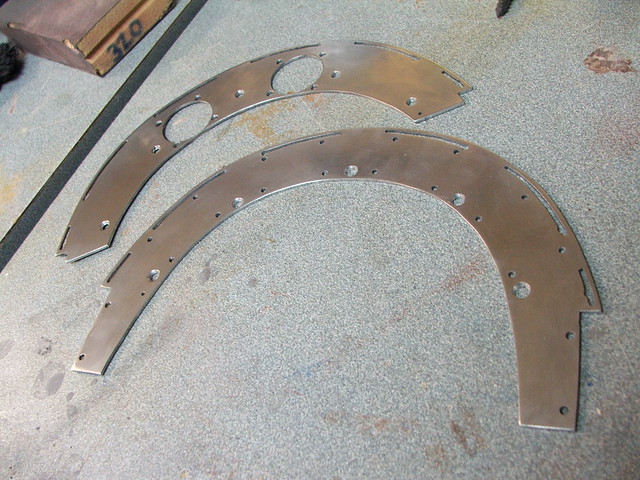
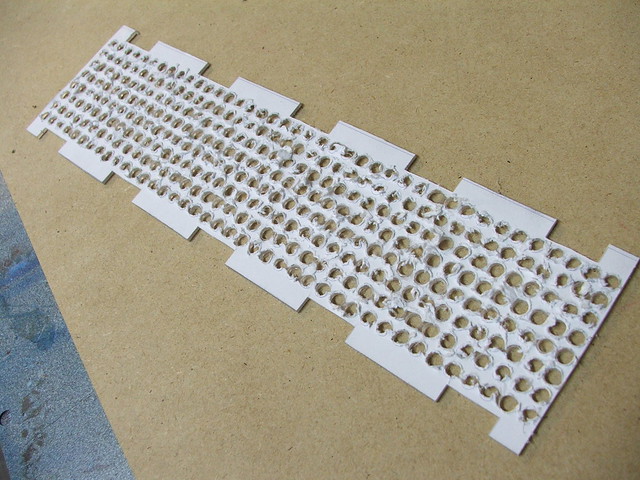
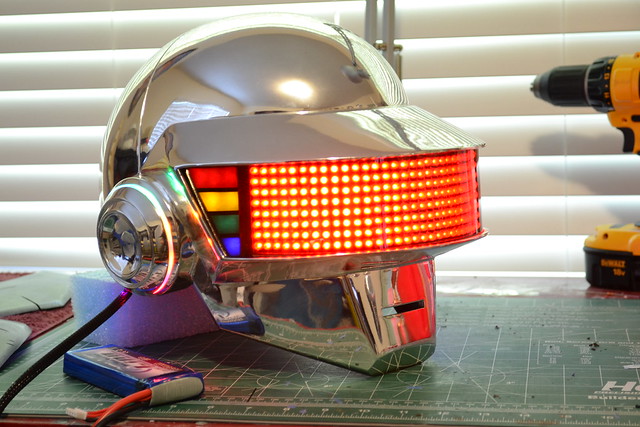
The subvisor with protective plastic still in place. 320 holes!
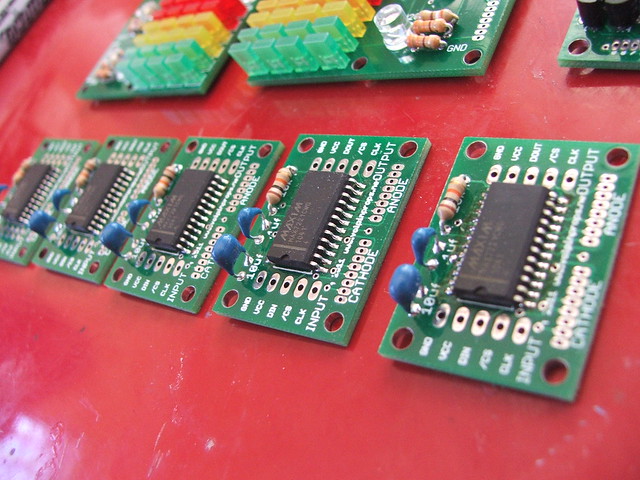
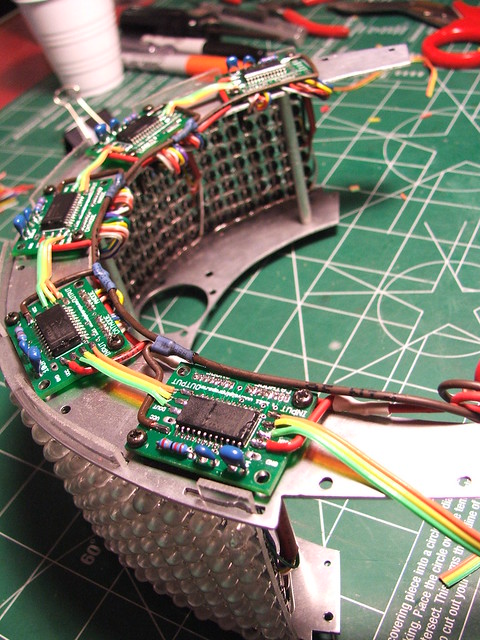
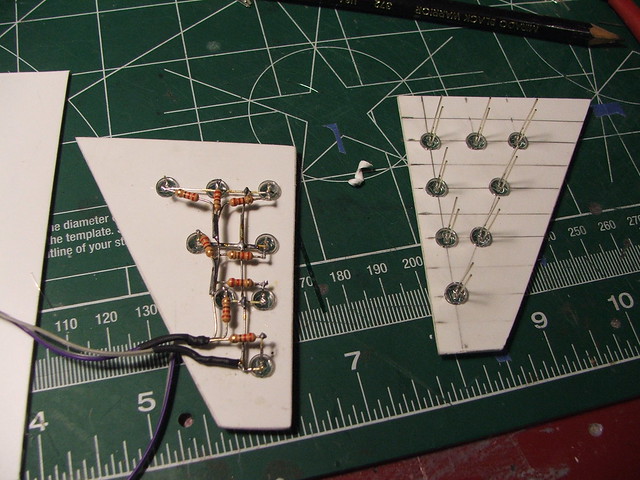
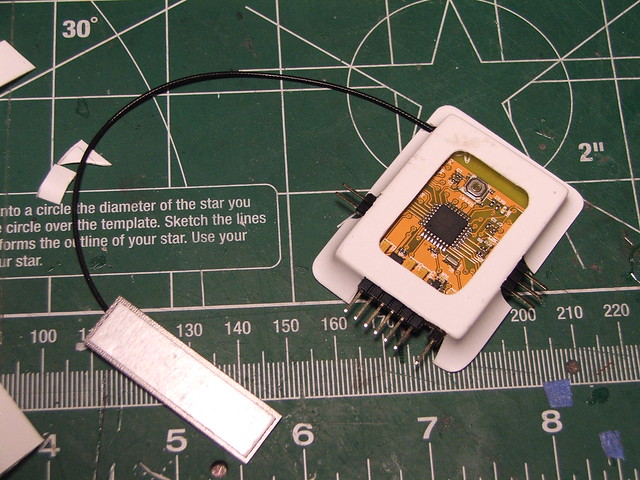
These are the chips that drive the matrix. Each holds one MAX7221 multiplexing LED driver with input as well as output sides of the board to make this a scalable design. Each will drive one 8x8 matrix and are designed to be daisy-chained together. Boards were designed in CadSoft's Eagle PCB editor. They're not a bad design, but there are improvements to be made in future designs.
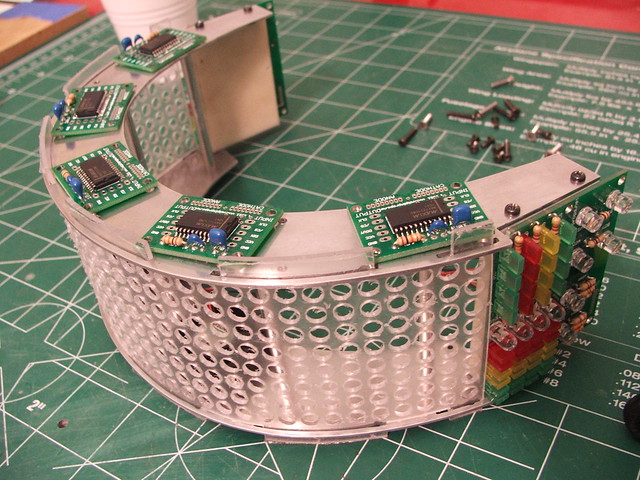
You can see the 2 small 5V fans situated on the subvisor frame below.
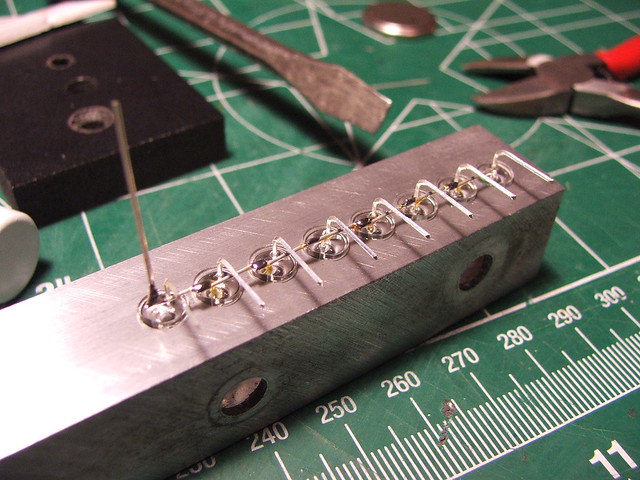
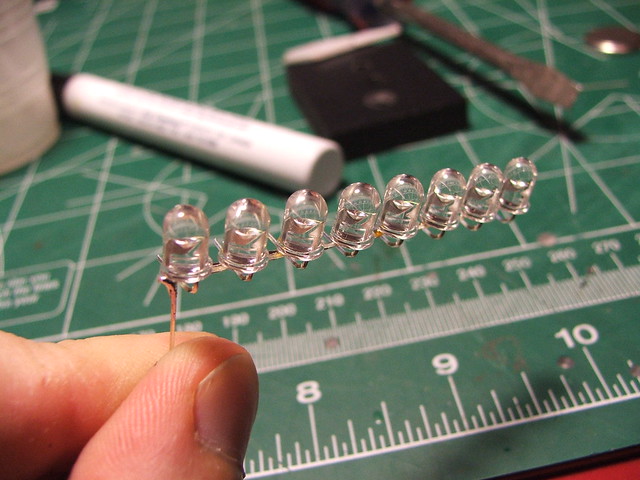
Since I needed to bend the leads on 320 red LEDs, I made a small jig to keep things a little more precise. Using this, I only had one in all 320 wired backwards when it came time for testing! If you're looking for LEDs for your next project, I get mine from SuperBrightLEDs.com
A second jig was made in some scarp aluminum square tube for soldering the columns together. Since the subvisor curve is a simple (that is, one axis) curve, I was able to do these solder joints outside the assembly.
Repeat 40 times.
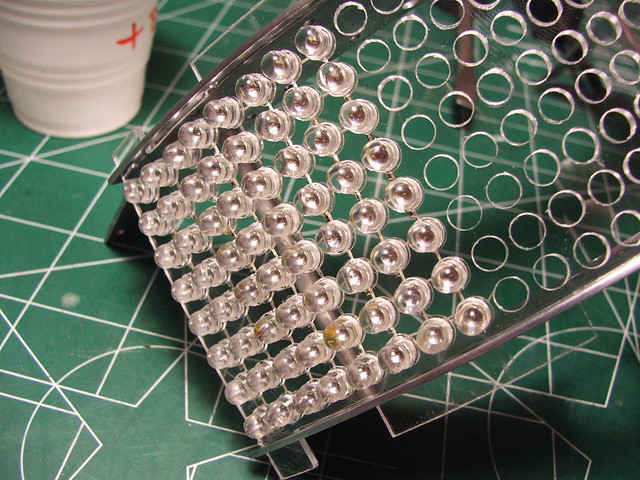
Once the columns were in place, I was able to solder the rows together.

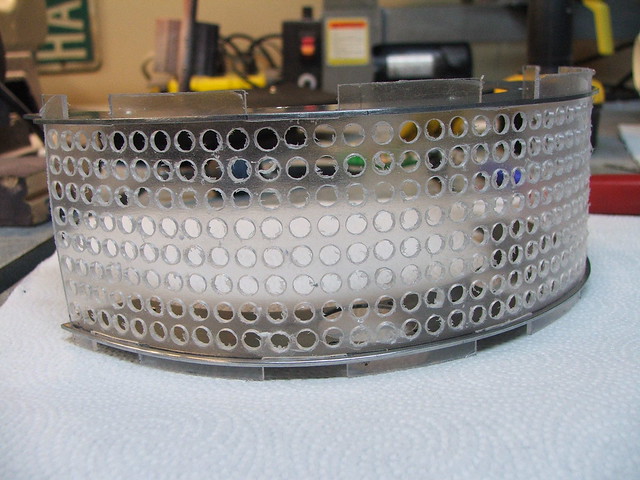
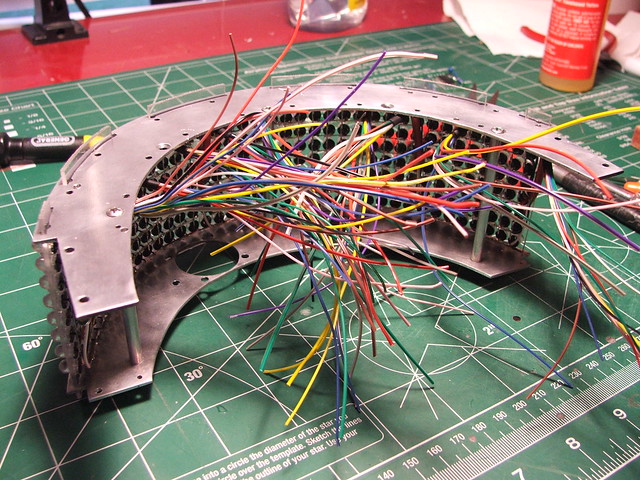
Since nothing was glued in at this point, I was able to push the LEDs back out of the subvisor and wire up the rows and columns without worrying about getting crud all over the clear PET sheet. At this point, I also painted the backs of all the LEDs black to reduce the amount of light leaking back into the helmet, and the wearer's eyes.

And then mounted back into the subvisor frame. A lot of tidying up to do.
This was an exercise in frustration. Next time, I'll be sacrificing board size in order to have slightly larger solder pads for the matrices. Bleh.
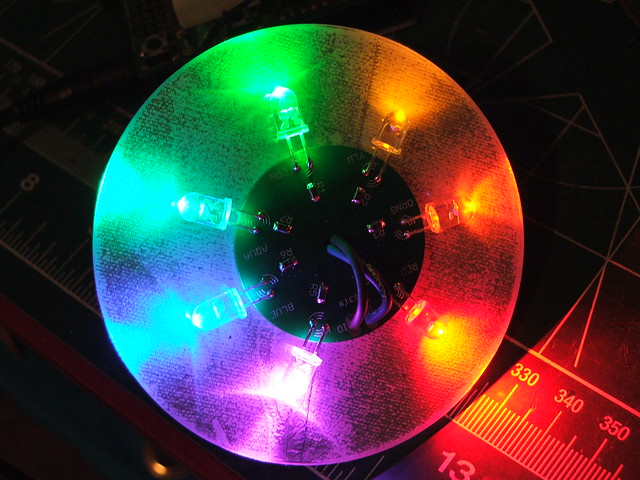
A comment from a fellow member of the Replica Prop Forum asked if I was going to be adding Thomas' ear LEDs as well. I hadn't planned on it, but the more I considered the idea the more I wanted something there. These are simple I/O boards which illuminate a clear disc mounted in the ears with 7 different colors. The final effect was well worth it!

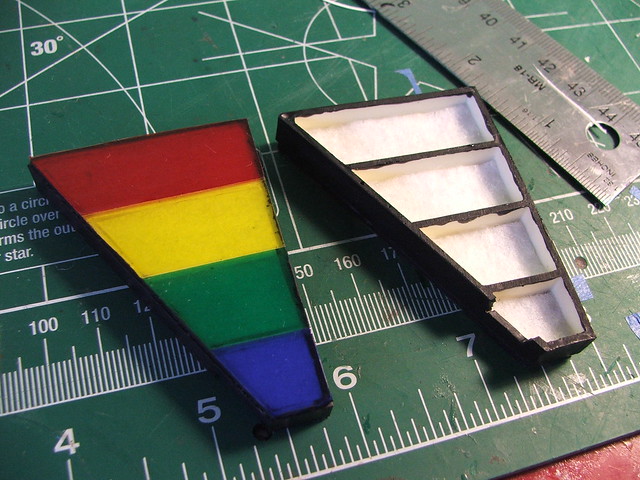
I also tossed together a quick mold of for the side light bars. Easier than building 2 from scratch and trying to make them identical!
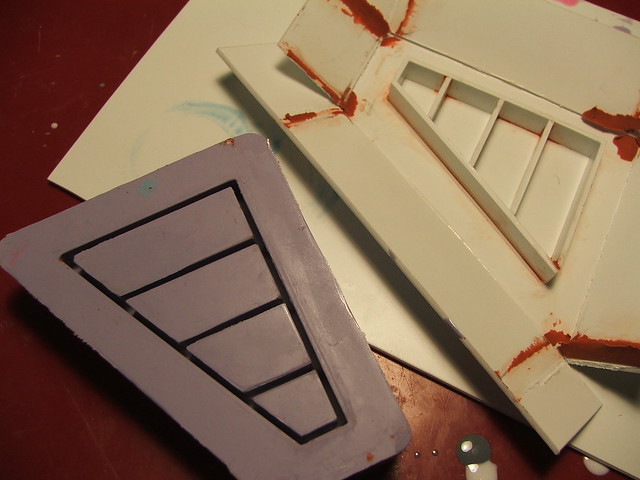
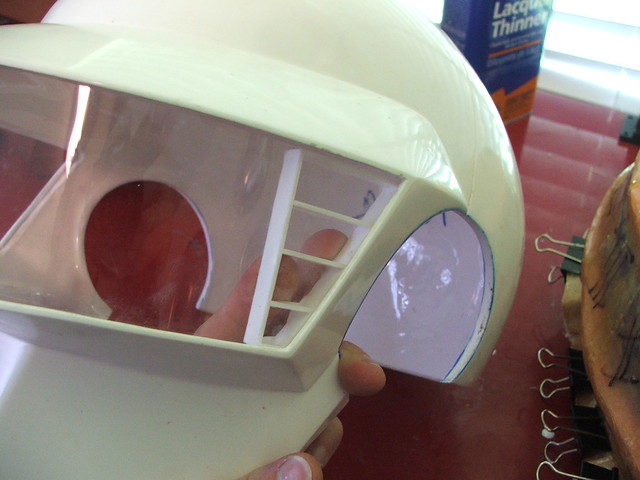
In the end, my fancy boards for the side lights got pushed out of the way by my slightly ambitious 8x40 matrix. I made some simple I/O lights (literally days before the debut of the helmet at Dragon*Con in Atlanta!) to fill the gap left behind. The lead arrangement on them isn't my most stunning work, but they get the job done.
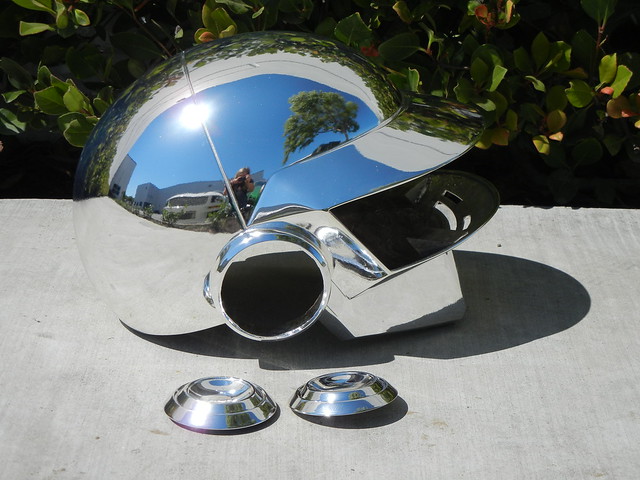
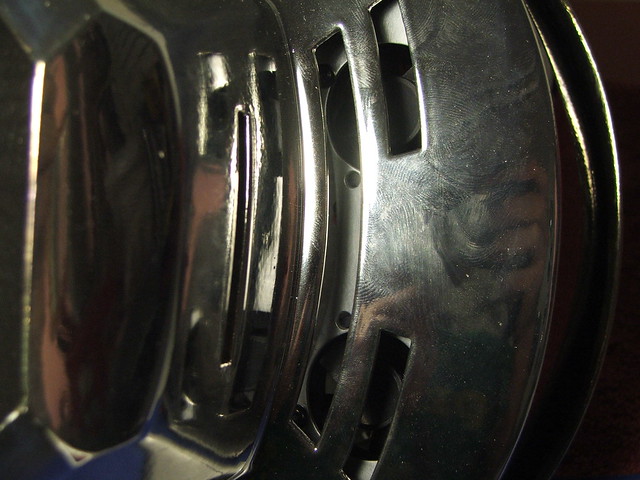
To bolster my spirits somewhat after this small letdown, I got the following photo form Creations n' Chrome. Stunning.
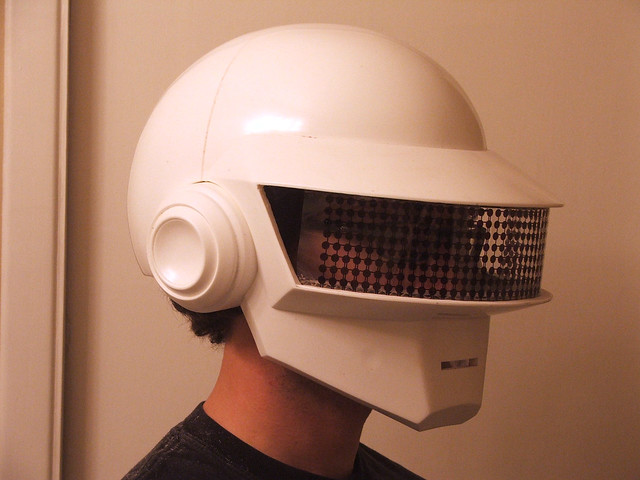
Still more to do! I put together a visor buck from MDF and styrene sheet for the PET visors. My first attempt at vacuumforming went alright, but the draw distance was rather far and the final piece was a bit too thin.
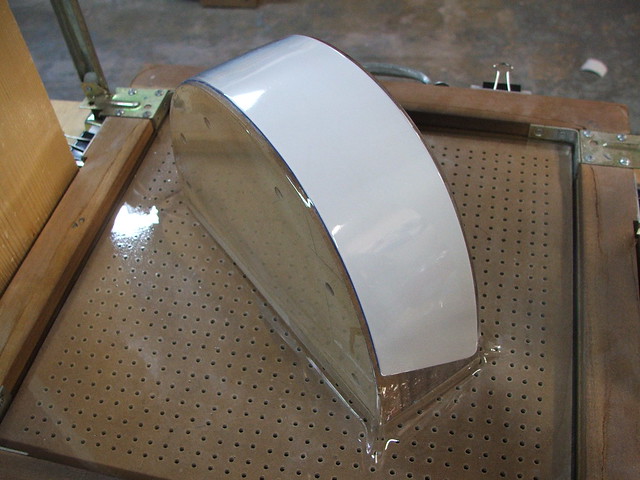
Instead, I strapped a 2.5" tall sheet of PET plastic to the buck, then heated it with a heat gun until it held shape. Perfect!

At this point, things needed to start going into that shiny chrome bucket. First went the ear lights, shown here being tested off a breadboard until the power supply was finalized.
Then the visor went into place. I don't have much in the way of documentation on this process, but if you're interested in using RIT dye to tint PET plastic, check out this post on the RPF. Tekparasite uses one of my helmets in his project, and came up with a really great method of getting superb results without all the finisky nonsense of niteshades spray tint.
The matrix is controlled by an Arduino Yellowjacket. James cooked up an iOS program that allows the helmet text to be changed over WiFi, as well as allowing the user to select certain patterns. For Dragon*Con, a switch was implemented that ran down my sleeve so I could toggle through animations more easily. The hardest part isn't seeing or controlling an iPhone with the helmet on, its actually getting it out of your pocket with those glove plates in the way!
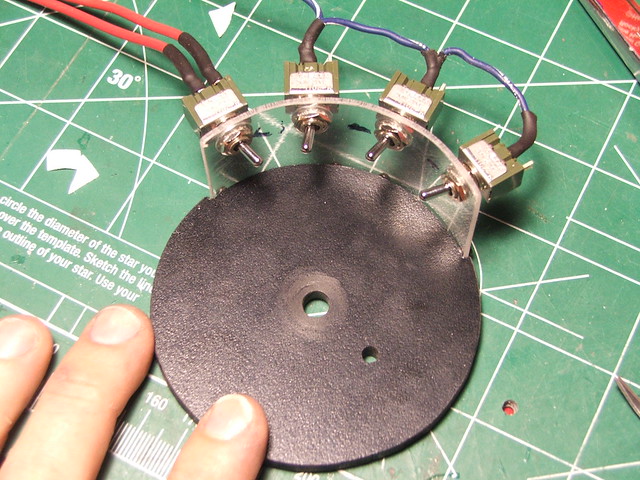
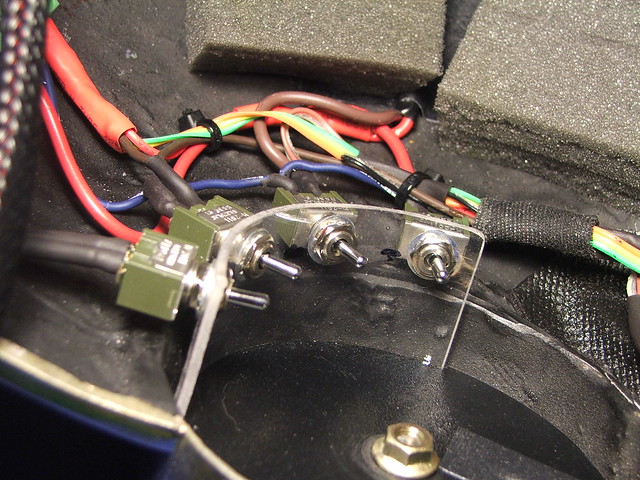
This switch plate, mounted to one of the ear pucks, controls various parts of electronics. From left: 5V regulator, YellowJacket & matrix, corner & ear lights, vent fans.
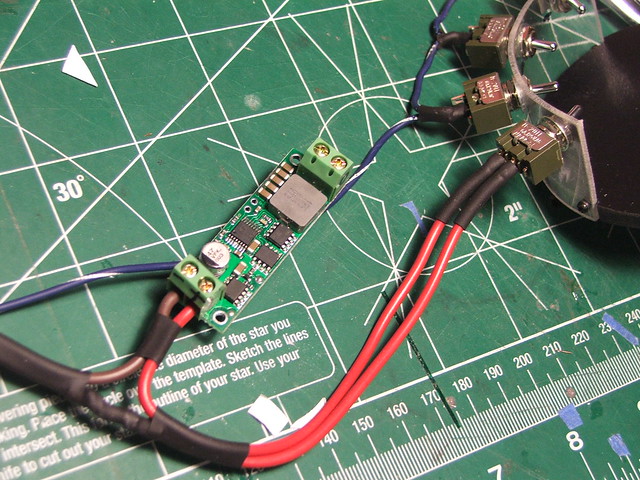
The aforementioned voltage regulator. After building my own linear regulator (and finding out it would probably set my hair on fire) I decided to order this one from Pololu. 7A continuous current and up to 24V input! My helmet ran on 11.1V 3S LiPo batteries, but could have easily run on a 7.2V 2S as well.
Vent fan placement - remember, if you live anywhere that gets above 50ºF outside, you need these!
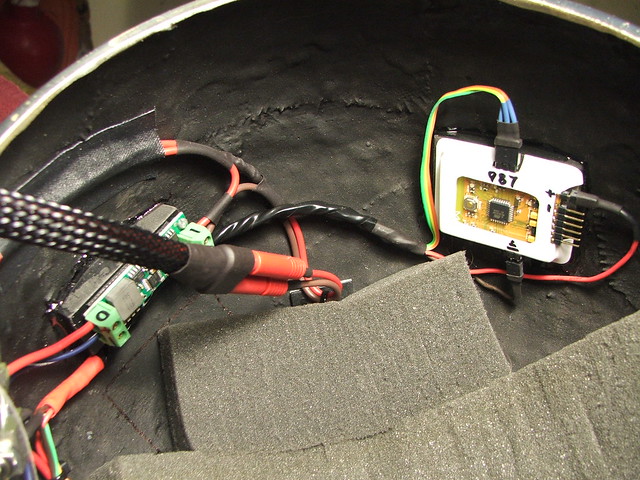
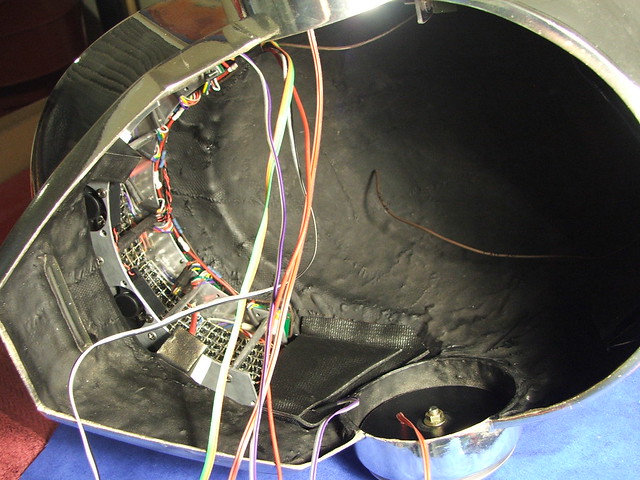
A few images of the final wiring getting tidied up.
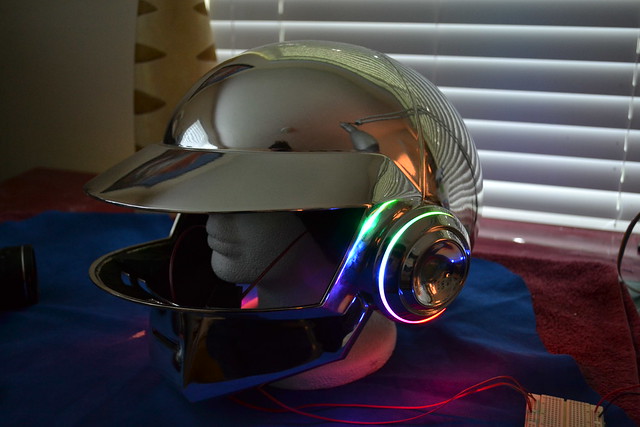
It works! With the LEDs off and with ambient lighting, you can see the matrix behind the visor. Since I decided against using video glasses or a camera, I needed the visor to be as light as possible to avoid light reflection back into the helmet. For those who will ask - you can see very well with the helmet on! The brighter it is outside, the easier it is to see as the incoming light is stronger than the ambient light inside the helmet.
That said, if you try to wear it in pitch black, you're pretty much blind. Still, it looks cool!

Below are just a few of some of the amazing pictures my friends have taken of this bucket for me. There are more on my Daft Punk Thomas Photography blog entry, so be sure to check that out as well!
Images courtesy of Bill Doran: (see his Flickr for more images here)


If you'd like to see more photos of the build process, be sure to check out my Flickr stream here.
Thanks for reading!
71 comments:
Fantastic!
DANG this is sweet bro. The photo shoot pics came out so authentic.
awesome!!
How much would it cost for you to make one of these for me? (full set)
I'm completely awestruck here...
It's... beautiful... :'D
Awesome stuff as always! I hope you take disciples :P
Absolutely stunning!
WOW WOW WOW that is some absolutely amazing work you have done.
Outstanding. Obviously, this took a lot of work, and not just physically, but also you had to do a ton of research to make all of the different pieces work. I think the thing that is more cool to me is that you can still see very well out of it even though you have no external camera or anything like that! Great job sir; can't wait to see what you have cooking next!
Is it for sale?
Just wow...
WOW! You truly are a magician, Harrison! Being a huge Daft Punk-fan myself, I am enormously impressed by your skills and of what you have accomplished with the two Daft Punk helmets.
Keep up the good work. I look forward to see your next project.
Greetings from Norway!
One word, incredible. The craftsmanship and detail on that helmet is just breath taking. Its truly a work of art. Taking a look at your daftpunk helmet reminds me of why i became a fan for ages. Looking forward to your future projects!
Greets from Malaysia
Are you willing to sell that or even make others for sale
How much? I'll pay 1 of these and 1 Testio Helmet
YOU NEED to sell these!!!!! I'd def buy one!
sell this shit!!!
For the love of god: you NEED to put these for sale!
You need to sell these. Even though I understand there's probably copyright issues with doing that... But there's always under the table. Demand is high. I want one.
You sir are an artist, an architect, and a skilled person all together, great job sir!
I love it!!! Do you have any blueprints? If you have please contact me josf.spetlak@gmail.com Thanks!
nice
I absolutely love your stuff, you are very detailed and professional with everything. Very inspiring stuff.
Do you have any pictures or tips on how you padded the inside of the helmet to fit snug on your head??
Thanks and keep up everything
How do you see?
How much you spent to make this helmet?
Sell this please!!!
Hey, saw the article on Engadget and wanted to say kudos. Looked amazing in person at D*Con. I took some footage of the display because I thought it was epic! http://www.youtube.com/watch?v=G6FKzq9r4Lg
how do i get into a career like this what skilss do i need and what exactly is this career called like prop making or sumthin
Where did you get the pcb's for the ear-leds?
hola que tal,estoy interesado en este casco,cuanto podría estar valiendo,les dejo mi correo para contactarme,desde ya muchas gracias mauricio_nacif@hotmail.com
excelent bro. how much ???
I WILL PAY YOU IF YOU MAKE ONE FOR ME!!!
OMG U R the best man on the planet that make replicas soo good.
(I wish I had just the helment body the electronic stuff I can do on my own)
how do you see out of it?
This is a link on the inventables site showing an easy to use transparent LED Film the visor might actually have been better had you used it.
LED Film: http://tinyurl.com/88lj3ql
Jhulsinger, those are $140 a piece, and I need at least 320 LEDs for the display. Not really a possibility...
how much does a helmet without the leds, just molded?????
I am very interested in Daft Punk helmets you've made ....
I'd really like to know if it would be possible to buy one out of the mold ?
thank you very much
best regards
Dear Harrison:
Great job! There's some posibility that we can buy the helmets that you build? How much?
Greetings from Chile
E.
Awesome times infinite!
I would gladly commission the helmet. Id assume it would cost 700usd+. Let me know if you are interested.
Hey, could you PLEASE put out the arduino code or at least some of it as open source?!?!?!?! this would be AMAZINGLY helpful! Thanks so much-- William
FANTASTIC !!! can you send me the project ?
wao.... its awesome!!!!!!!! can you sell me this helmet??????
Would you make them, and sell them?
Wow, simplily great! your work is wonderful, thanks for gimme the initiative to begin a project like that, the part 1 looks easy but the hard job will be get the lights! i hope that in my city i could find a site that makes me these works in LED's XD.
Ok, i must start to collect money right now for make these helmet in halloween 2013, hahahaha
Excuses for my english, i'm colombian and thank you for share the steps!
PD. Do you think in make the Guy-Manuel's Helmet?
Hi were can i buy ??? do you sell this replicas? plase let me know... thanks
Hello, I would like to know how to program the LEDs to make these drawings thanks.
here I leave my mail: kevin231009@gmail.com
how much did this cost you and also could you also tell me the answer to Kevin 23's question
please send the answer to my email and thank you
ryanjones119@gmail.com
that is absolute quality, love the work!
Hey, don't have another way to make this helmet a little more light and cheapest?
Please say me the price! I want a buy send me an e-mail:
sebastian_sbg@hotmai.com
hi, greetings from chile, i just wat to ask if yo sell those helmets or at least without the lights and ill do it myself, but do you sell them?
please respond me at this mail: j_guerra26@hotmail.es
thank you
Hi , Nice work ! ! Do you sell this with or without the lights ? Send me a mail with any info pls ! ichigoviziard@gmail.com
Nice post. I'm also interested in the LED lights for my car and house decoration. Thank you for sharing.
Is there any way you can show the exact measurements for the helmet??? :O
Hello, I'm wondering if you are interested in selling a Thomas helmet and a Guy Manuel please contact me by my e-mail which is ramirez.michael55@yahoo.com Thankyou!
Hi there, Are you still making these Thomas helmets with the lights and everything?
I really really REALLY want to buy one off you as a birthday gift for a friend of mine. His birthday is in November 3rd and I would love to have it by mid October if possible.
Could you please tell me total costs to complete with lights and everything to fit an average adult males head size, and to send to Australia Brisbane. Thank you :) (in aussie dollars approximately please) you can get me at rmcentyre@dualaustralia.com.au or renee.a.mcentyre@gmail.com if that bounces back. Please Please PLEASE let me know if you can do this for me. Thanks :)
Hi Harrison, love your work, this is amazing! You've inspired me to take a crack at building my own Thomas helmet. I'm an embedded systems engineer and love electronics, but my artistic skill is almost negligible XD
I had a question I'm hoping you may answer... how are the electronics held within the helmet? I'm not sure I can tell from the pictures; I see the Polulu regulator is held on a little black block, and there are two little blocks holding up the visor assembly, what material is that?
Thanks! Warm regards,
Charlie.
How did you know what "motherboards" to use, like to connect the lights
The most awesome helmet of all time!
Cheers from sweden!
And are you selling a cast of the helmet?
Just when it's plain white and nothing done to it?
Great work mate! :)
(Neergaard88@gmail.com if you wish to answer me back about a price!)
hi Harrison, i want to know if u have all the pcb's in a program, and if u cant send them to me pls =D thxs
my mail is fgatik@gmail.com
Amazing job guys. I'm trying to re-create parts of this, any chance I can get your PCB schematics and/or Arduino code? Let me know... mvanantwerp@gmail.com Thanks!
Looks soo good. I'd really like to learn to make one myself or buy it either way I want.
I can see in some of the pics that you originally had some different light boards to go on the sides of the LED matrix. Why did you decide to not use those, and to use the triangular side lights instead?
waoh amazing !
MAD PROPS! I'm a newbie in the replica world and I bit off my first daft punk thomas helmet. Im 2 months in and just started on the LED wiring and Chroming this week, I often Look at this posting to keep me motivated!
THANKS YOU ROCK!
FFFFUUUUUUUUUUUUUUUUUUU
Hey Volpin like saying if I could make one as soon as you would pay if you accept my gmail want slendi03@gmail.com
Oye me interesaria muchismo comprarlo, si hay alguna manera porfavor comunicate conmigo estoy dispuesto a pagar lo que se necesite mi e-mail es gabriesaenz@hotmail.com porfarvor espero su respues los mas pronto posible muchas gracias♥
Post a Comment