
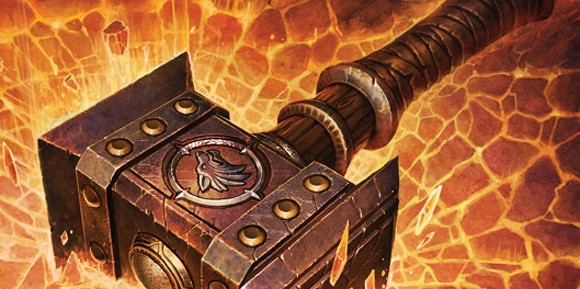
A friend of mine who takes costume commissions (Check out her work at God Save The Queen Fashions!) sent me an inquiry a few months ago asking if I had any interest in helping her put together a few accessories for a World of Warcraft project she had coming up. The character was the Warchief Thrall, and he needed his iconic Doomhammer.
There are a lot of versions of this weapon floating around, but it was decided that the source would be the Doomhammer as it was shown on the cover of the novel "The Shattering"
From this reference and a couple others, I put together some blueprints in Illustrator. The finished result would be formidable and quite large, but just a bit shy of gigantic. 30" tip to tail, to be specific.

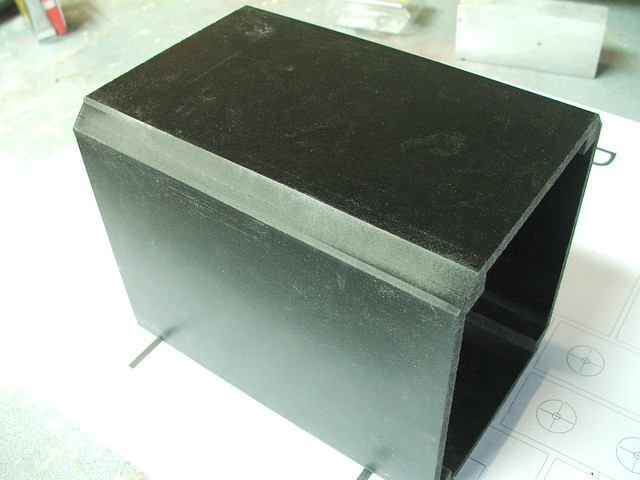
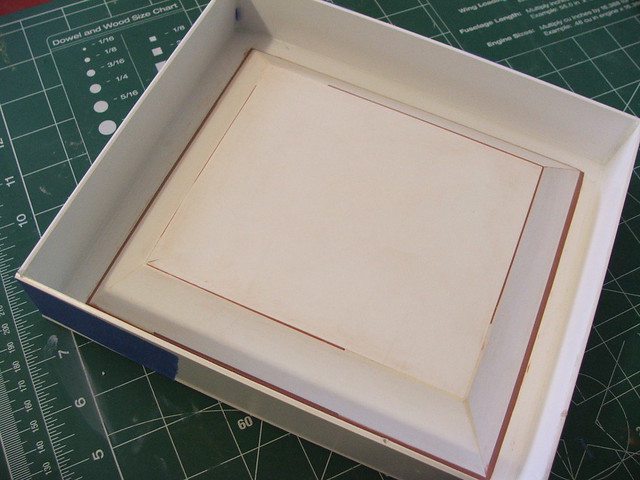
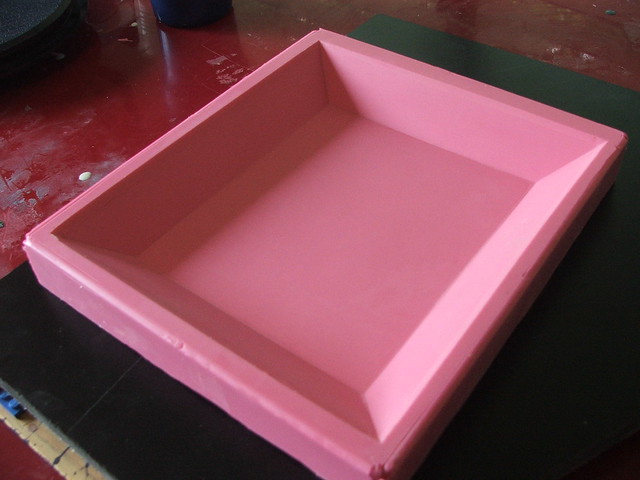
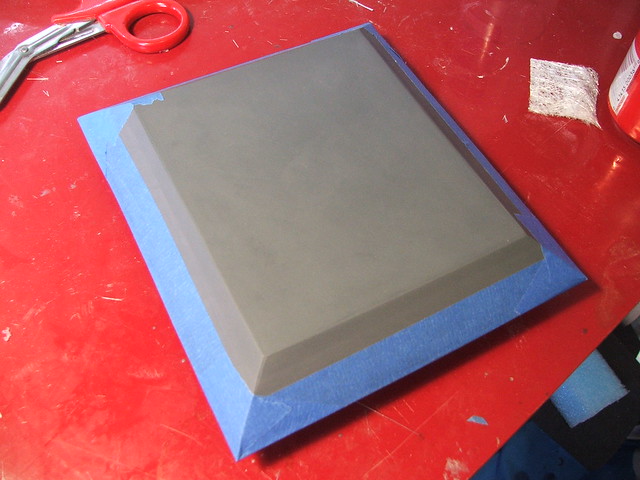
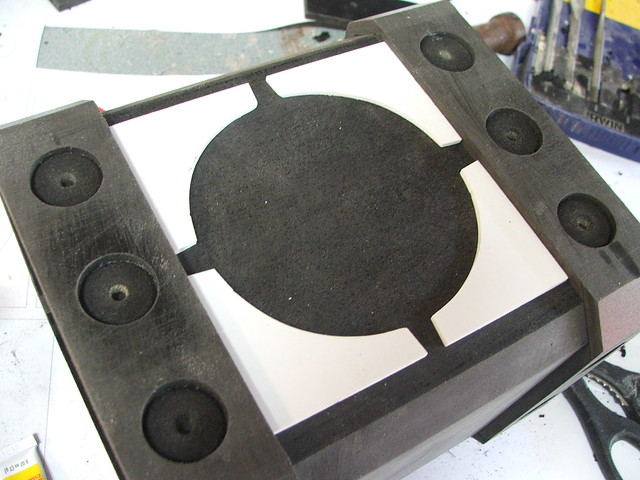
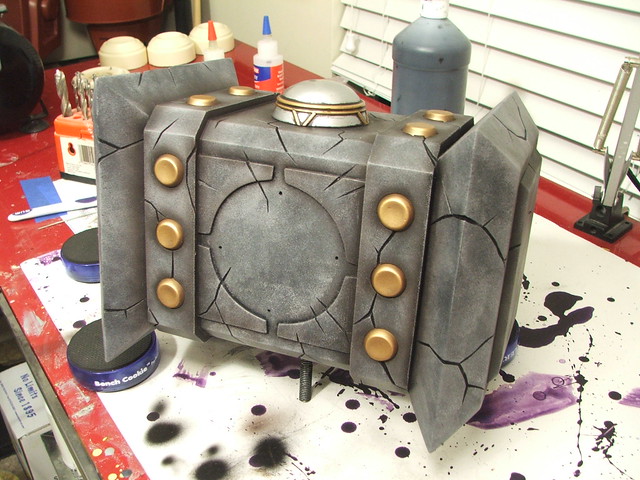
To keep things as lightweight as possible, I decided to construct the head of the hammer in hollow sections. I used 3/8" sintra sheets to make the main box of the head, then angled the sides with a 45º router bit.
The diamond-shaped faces of the hammer head started out as this styrene block. This was then molded to make 4 copies that would become the hammer faces. The mold is made from Smooth-On's Mold Max 30 silicone.
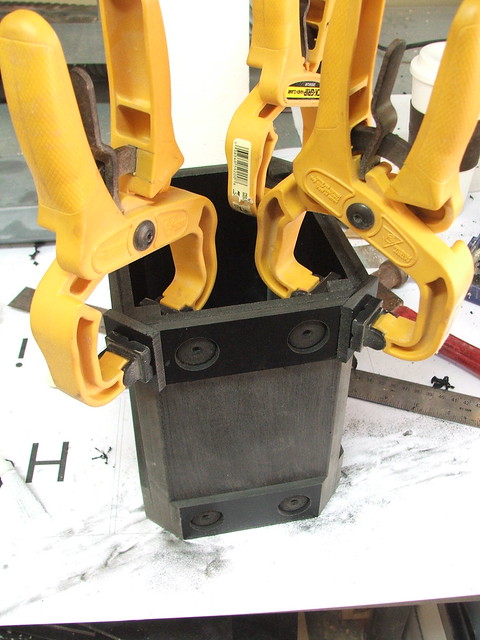
After pulling castings, the seams were taped shut and more resin was poured into the hollow inner cavity to join the two halves together. This created a little bit of cleanup after the fact, but the finished part is lightweight and hollow.
An early mockup. Fancy!
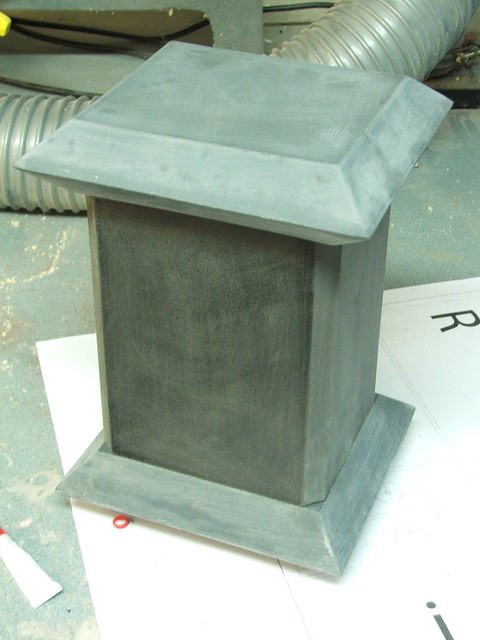
The bands on the hammer were made from more 3/8" sintra. Countersunk holes were made before these strips were glued in to house the large gold rivets which would be added later. With sintra, the best adhesive is cyanoacrylate - super glue. It actually melts the parts to one another, fusing them into a solid part.
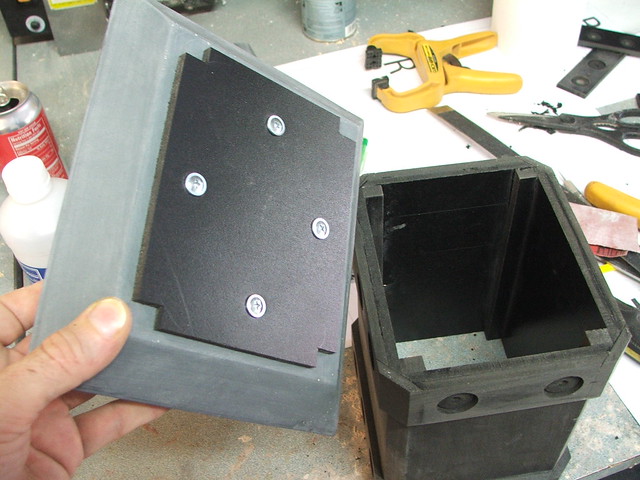
To get the hammer faces to mount to the main body, more sintra was cut into a plug which would be glued in place after painting.
More mockups! Coke can shown for scale reference.
More details were added with styrene sheet. To get these parts symmetrical, 4 sheets were adhered together with double-sided tape. The part was then cut on my bandsaw, then the 4 sheets were separated. Instant symmetry!
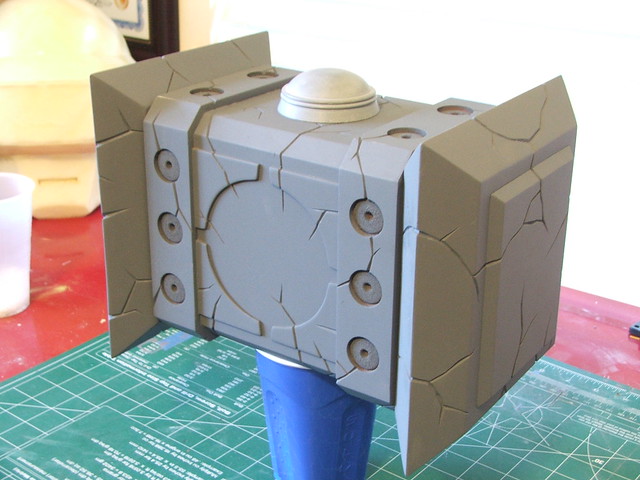
After a coat of primer, I spent the next 2 days painstakingly carving cracks in the surface of the hammer head. While the sintra is easily carved, the styrene put up a pretty good fight. The results of this process were well worth it though!
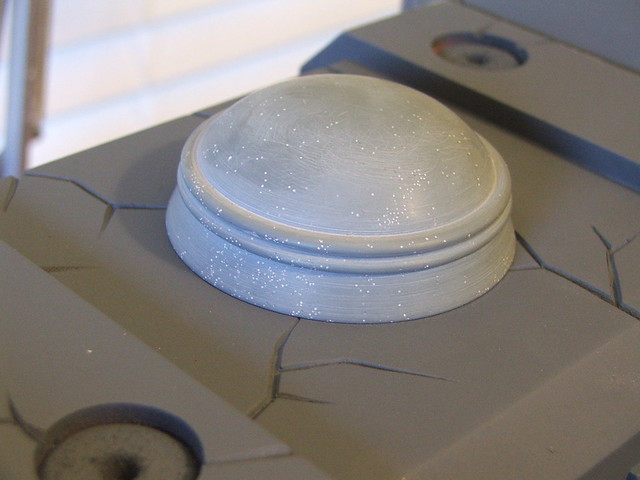
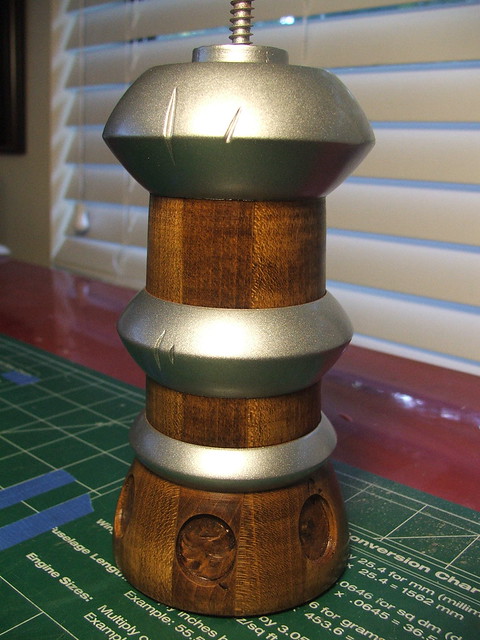
In the shot above you can see the top nut placed on the hammer head. This was lathed from a single piece of casting resin. Unfortunately, the blank it was tooled from was not degassed properly, so I had a lot of tiny little air bubbles to fix before it was ready for paint
Filling said bubbles. I also added more accents with half-round styrene bar.
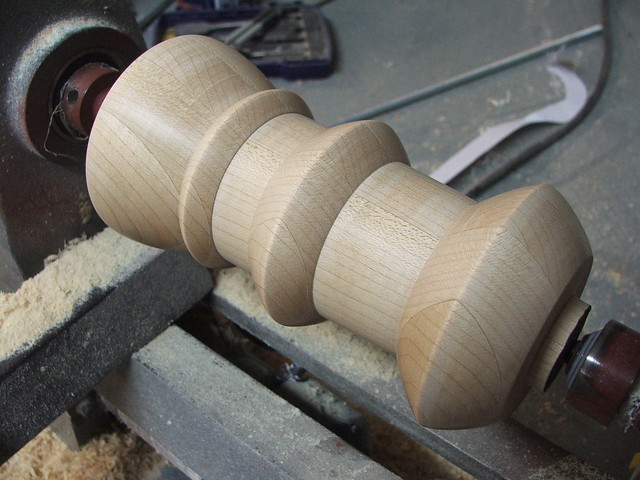
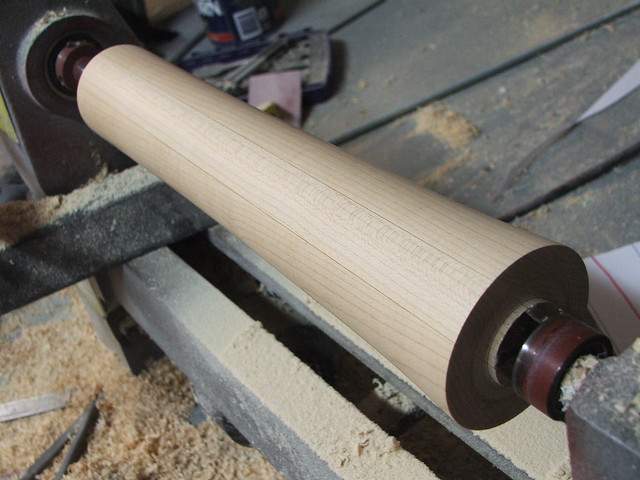
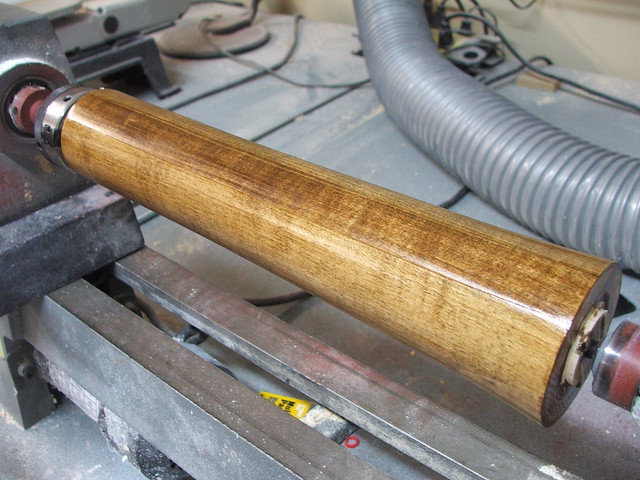
Other lathed bits included the handle, head stock, and pommel. The first two were cut from laminated maple boards, while the last one was cut from another block of casting resin. After the maple was turned, the parts were stained dark brown and sealed with urethane varnish.
Its worth mentioning that these started out as 4"x1" planks. After laminating, cutting these shapes from 4" blocks was a nightmare on my crappy Harbor Freight lathe. This project really did a number on the lathe head, so I think now is a good time to upgrade.
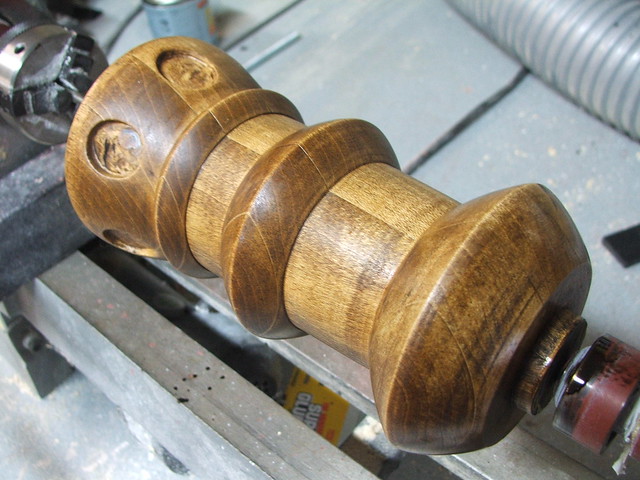
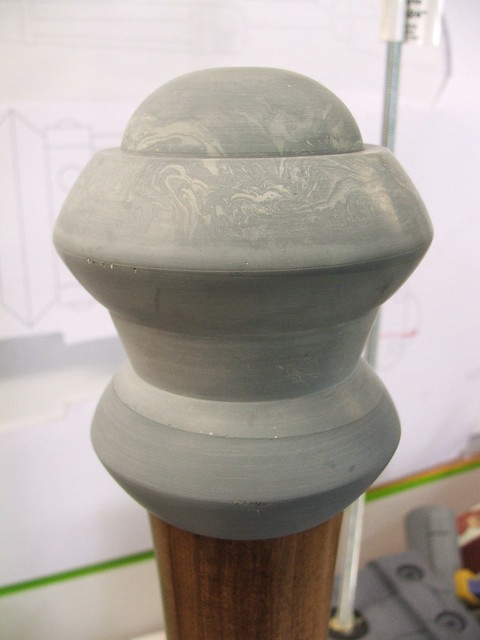
Parts after staining and sealing. Before staining the head stock, oval-shaped recesses were carved with a dremel for rivets similar the the ones used on the hammer head bands.
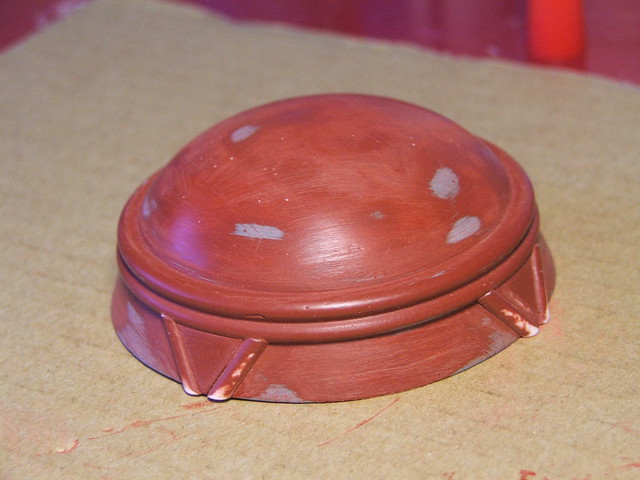
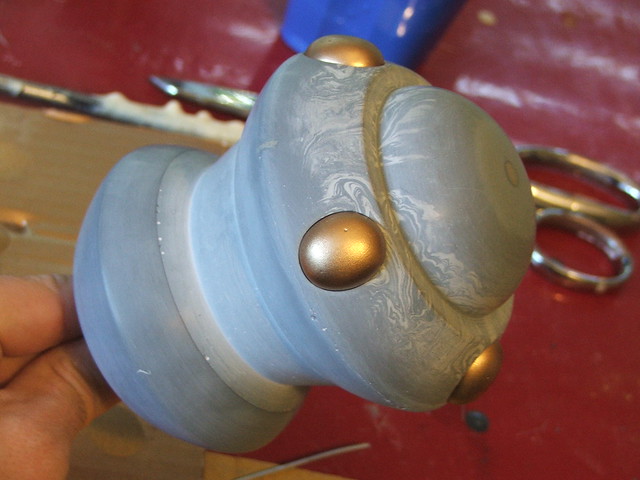
The pommel after lathing. It was necessary to make this part out of solid resin to counterbalance the enormous hammer head and keep the weight centered on the handle.
Recesses carved for rivets, as with the upper head stock. Not having any woodgrain to deal with, this is much easier to carve out of resin.
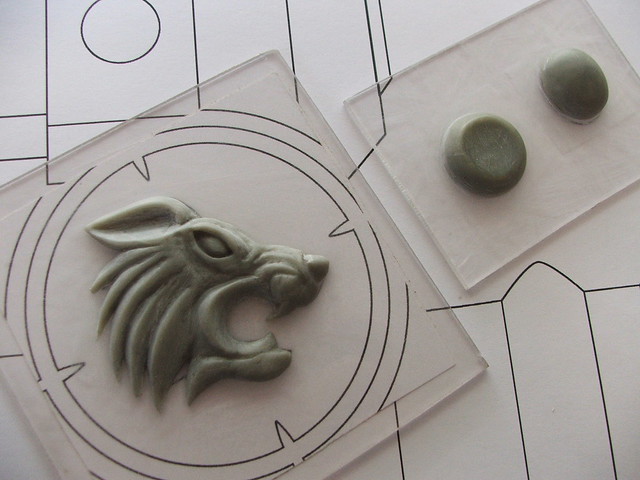
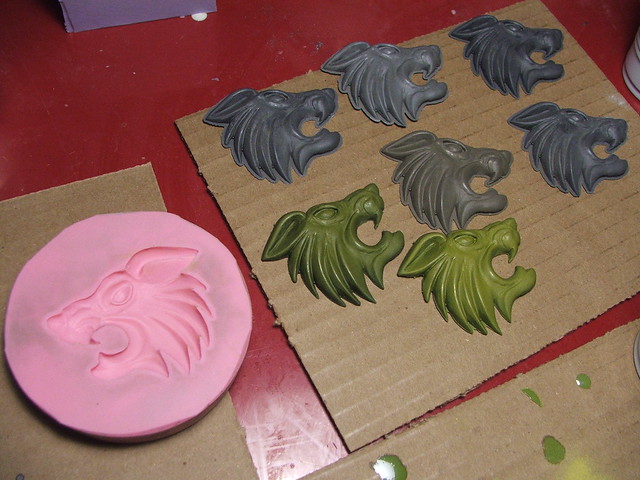
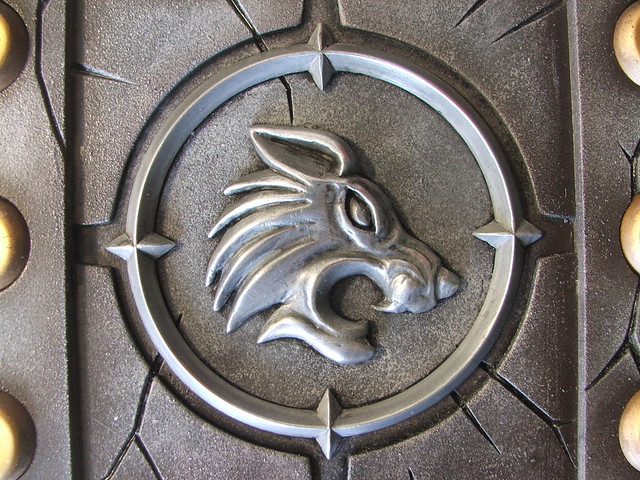
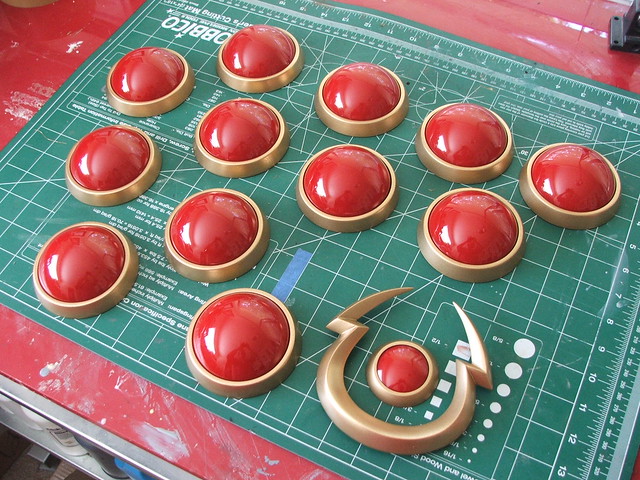
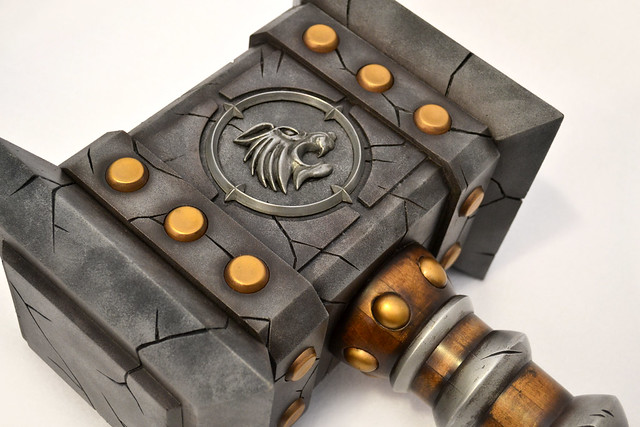
The side of the hammer features a snarling wolf, and I know my sculpting skills aren't stellar enough to make the same part look good twice. Instead, the piece was sculpted on an acrylic base and molded for copying. On the right below are the masters for the rivets used on the hammer. I needed 20 round ones and 10 oval-shaped rivets, and there was no way I was sculpting all of them by hand!
Some copies! These were cold cast with aluminum powder to polish them up later. The green ones were cast with brass powder; these were a test for another project. None of these have been polished in this photo - cold castings always look somewhat dull until buffed with some steel wool.
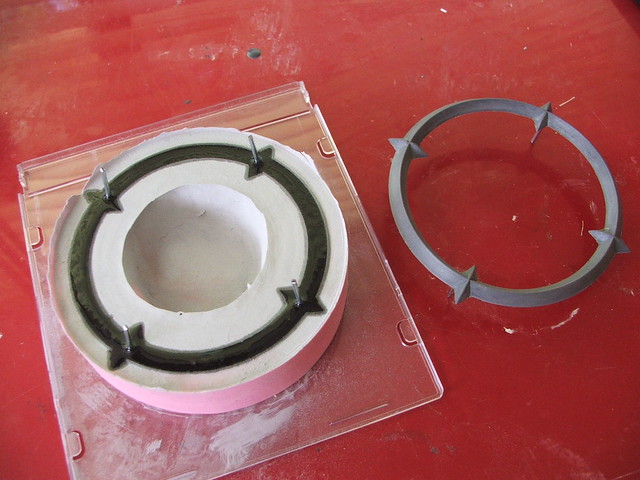
The "compass ring" as I started to call it was made by lathing a disc of resin into the circular shape, then adding the points in apoxie sculpt and molding the part. While the resin was curing, I placed steel bar into the plastic to make mounting points. You can see those poking out of the mold on the left side below:
Same parts as before with aluminum cold cast powder, and with some time spent buffing with steel wool. Eventually I decided to polish these up a little more uniformly to give them less of a "brushed" look.
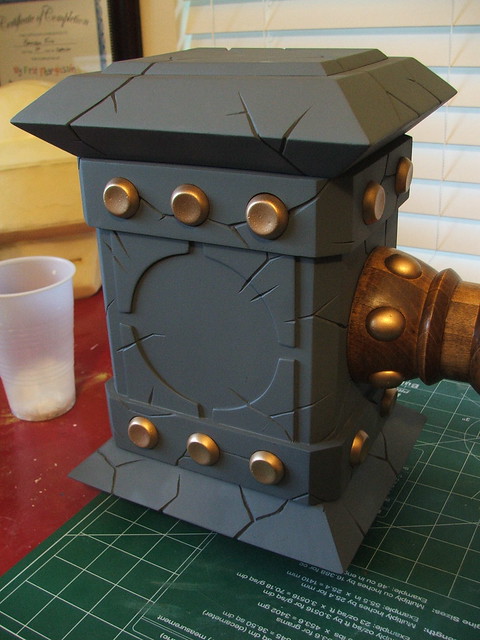
The hammer head and stock with rivets mounted. Each piece was cast in SmoothCast 320 resin with gold metallic filler. Rivets were glued in place with 2 part epoxy, but fit snugly enough in their recesses that no clamps were needed.
The upper stock with some carved damage and a coat of paint on the "metal bands." At the top of the shot is the large threaded rod that runs the length of this entire piece and into the hammer head.
Painting this piece was different and a new experience. I haven't painted a rock like texture before, so the whole process took a bit of fiddling around. I started with a coat of flat black, then sponged on layers of acrylic paint, in various tints of gray. 5 layers were used to make a varied texture, then I used my airbrush to fill in some low spots with darker browns and blacks.
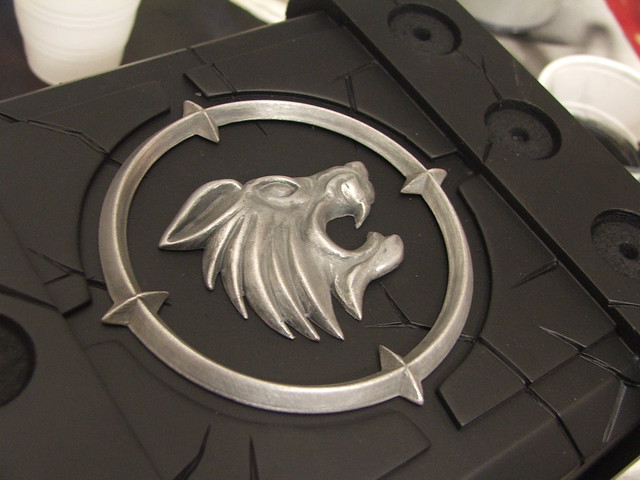
The wolf head and compass after polishing. I use aluminum wheel polish for parts like this.
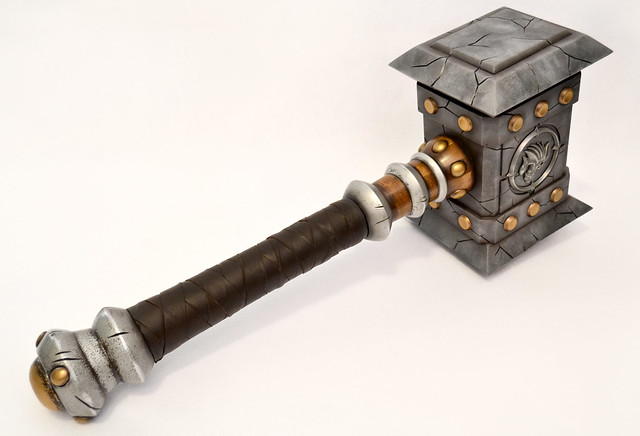
The last part that needed finishing was the handle wrap. I used several long thin strips of pigskin leather braided over top of one another to create the crossed pattern here. Took a long time to get right, and it was kind of a shame to cover up all the pretty stained wood, but it feels great to hold.

I also tossed some little bits and baubles together for the rest of the Thrall costume. If you'd like to see the final result, check out my friend Cathy on FaceBook at God Save The Queen Fashions.
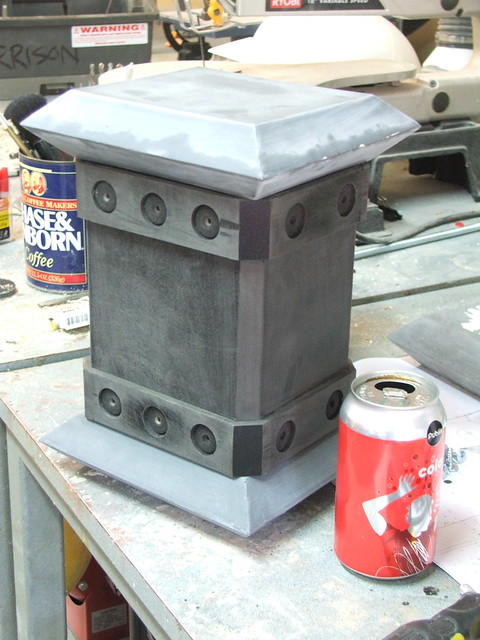
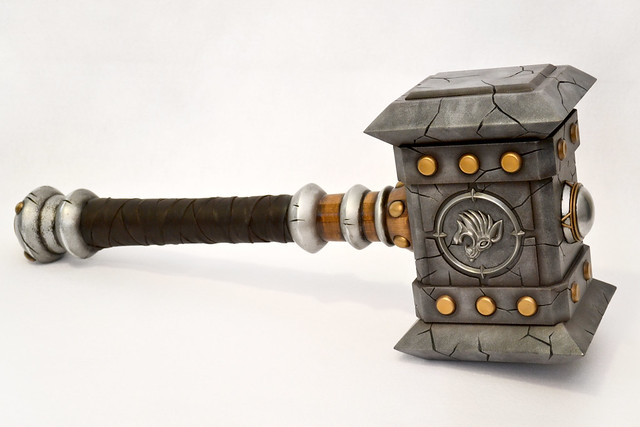
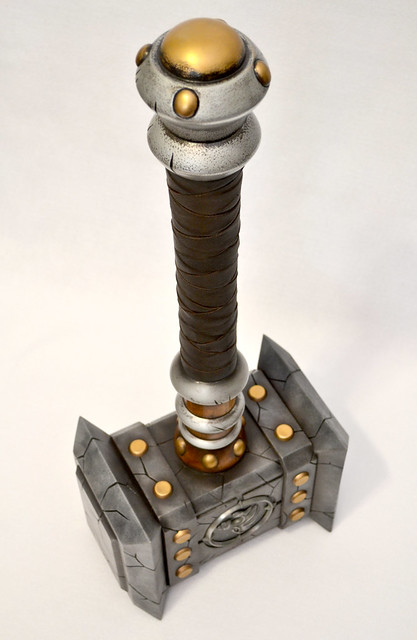
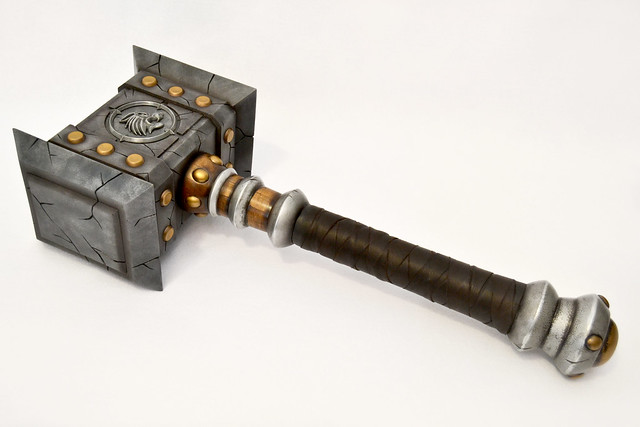
The final piece after assembly and clearcoat! Final dimensions of the piece are 30.5" long, with the head measuring 7"x9"x11.5" - total weight is a pretty manageable 8.5lbs! Not bad for such a giant prop.
If you're looking for more process photos (or the final shots in higher resolution!) check out my flickr page - there's a lot more there which aren't included in this write-up.
Thanks for reading!
There are a lot of versions of this weapon floating around, but it was decided that the source would be the Doomhammer as it was shown on the cover of the novel "The Shattering"
From this reference and a couple others, I put together some blueprints in Illustrator. The finished result would be formidable and quite large, but just a bit shy of gigantic. 30" tip to tail, to be specific.
To keep things as lightweight as possible, I decided to construct the head of the hammer in hollow sections. I used 3/8" sintra sheets to make the main box of the head, then angled the sides with a 45º router bit.
The diamond-shaped faces of the hammer head started out as this styrene block. This was then molded to make 4 copies that would become the hammer faces. The mold is made from Smooth-On's Mold Max 30 silicone.
After pulling castings, the seams were taped shut and more resin was poured into the hollow inner cavity to join the two halves together. This created a little bit of cleanup after the fact, but the finished part is lightweight and hollow.
An early mockup. Fancy!
The bands on the hammer were made from more 3/8" sintra. Countersunk holes were made before these strips were glued in to house the large gold rivets which would be added later. With sintra, the best adhesive is cyanoacrylate - super glue. It actually melts the parts to one another, fusing them into a solid part.
To get the hammer faces to mount to the main body, more sintra was cut into a plug which would be glued in place after painting.
More mockups! Coke can shown for scale reference.
More details were added with styrene sheet. To get these parts symmetrical, 4 sheets were adhered together with double-sided tape. The part was then cut on my bandsaw, then the 4 sheets were separated. Instant symmetry!
After a coat of primer, I spent the next 2 days painstakingly carving cracks in the surface of the hammer head. While the sintra is easily carved, the styrene put up a pretty good fight. The results of this process were well worth it though!
In the shot above you can see the top nut placed on the hammer head. This was lathed from a single piece of casting resin. Unfortunately, the blank it was tooled from was not degassed properly, so I had a lot of tiny little air bubbles to fix before it was ready for paint
Filling said bubbles. I also added more accents with half-round styrene bar.
Other lathed bits included the handle, head stock, and pommel. The first two were cut from laminated maple boards, while the last one was cut from another block of casting resin. After the maple was turned, the parts were stained dark brown and sealed with urethane varnish.
Its worth mentioning that these started out as 4"x1" planks. After laminating, cutting these shapes from 4" blocks was a nightmare on my crappy Harbor Freight lathe. This project really did a number on the lathe head, so I think now is a good time to upgrade.
Parts after staining and sealing. Before staining the head stock, oval-shaped recesses were carved with a dremel for rivets similar the the ones used on the hammer head bands.
The pommel after lathing. It was necessary to make this part out of solid resin to counterbalance the enormous hammer head and keep the weight centered on the handle.
Recesses carved for rivets, as with the upper head stock. Not having any woodgrain to deal with, this is much easier to carve out of resin.
The side of the hammer features a snarling wolf, and I know my sculpting skills aren't stellar enough to make the same part look good twice. Instead, the piece was sculpted on an acrylic base and molded for copying. On the right below are the masters for the rivets used on the hammer. I needed 20 round ones and 10 oval-shaped rivets, and there was no way I was sculpting all of them by hand!
Some copies! These were cold cast with aluminum powder to polish them up later. The green ones were cast with brass powder; these were a test for another project. None of these have been polished in this photo - cold castings always look somewhat dull until buffed with some steel wool.
The "compass ring" as I started to call it was made by lathing a disc of resin into the circular shape, then adding the points in apoxie sculpt and molding the part. While the resin was curing, I placed steel bar into the plastic to make mounting points. You can see those poking out of the mold on the left side below:
Same parts as before with aluminum cold cast powder, and with some time spent buffing with steel wool. Eventually I decided to polish these up a little more uniformly to give them less of a "brushed" look.
The hammer head and stock with rivets mounted. Each piece was cast in SmoothCast 320 resin with gold metallic filler. Rivets were glued in place with 2 part epoxy, but fit snugly enough in their recesses that no clamps were needed.
The upper stock with some carved damage and a coat of paint on the "metal bands." At the top of the shot is the large threaded rod that runs the length of this entire piece and into the hammer head.
Painting this piece was different and a new experience. I haven't painted a rock like texture before, so the whole process took a bit of fiddling around. I started with a coat of flat black, then sponged on layers of acrylic paint, in various tints of gray. 5 layers were used to make a varied texture, then I used my airbrush to fill in some low spots with darker browns and blacks.
The wolf head and compass after polishing. I use aluminum wheel polish for parts like this.
The last part that needed finishing was the handle wrap. I used several long thin strips of pigskin leather braided over top of one another to create the crossed pattern here. Took a long time to get right, and it was kind of a shame to cover up all the pretty stained wood, but it feels great to hold.
I also tossed some little bits and baubles together for the rest of the Thrall costume. If you'd like to see the final result, check out my friend Cathy on FaceBook at God Save The Queen Fashions.
The final piece after assembly and clearcoat! Final dimensions of the piece are 30.5" long, with the head measuring 7"x9"x11.5" - total weight is a pretty manageable 8.5lbs! Not bad for such a giant prop.
If you're looking for more process photos (or the final shots in higher resolution!) check out my flickr page - there's a lot more there which aren't included in this write-up.
Thanks for reading!
28 comments:
Flawless in every way imaginable, you inspire more and more with each passing day!
As always not only a great prop but a great write up too!
Wow, just wow!
Man, you are such an inspiration, and as always, a great job!
Congrats! =D
I guess I have to check the labels on my glue, The super glues I've used don't seem to bond the Sintra all that well and I've been wanting to find another method, but maybe the stuff I've used is different than what you recommended. Thanks for that info! I'm also curious to learn more about the method you used for casting the wolf head and compass, time to hit up Google and youtube for that. Thanks for the awesome write-up again !!
Awesome work.
I'm curious about your use of the word "lathed". I've always heard (and used) "turned".
If this a regionalism?
WRT upgrading your lathe: I do a lot of woodturning on a Powermatic lathe. It's monstrously big (weighs > 700 lbs), but I love it. You might look into getting one used on Craigslist.
awesome!!!! wish i could make one!
A beautiful job. The cracks and weathering are just brilliant.
Now this is something special.
I only have one question: WHERE CAN I BUY ONE!?
How can someone get into making such awesome cosplay props? Its something I've always wanted to do...but I have no idea how to get started...
omg !!! i love it ! Great work!
AMAZING, and indeed: they should make it for sale
ЙЕАААААААААААААААААААААААААААААААЗЬ!!!
Perfect! Great work!
My friend... Congratulations...
Yeah, can I buy one please? =-) that's amazing!
Dude, srly how much is that?! how much?
darn you're good~
That is awesome!
Fantastic!
- Jamin
there is motivation for me...
and onn woard juhst wow....
Good! You could not play this game and do something for her. this is the best result!
Amazing - as usual :)
Can you tell me the exact dimensions of the head...or post a image with the exact dimensions of every part?I'm trying to make one in 3D but i don't know exact dimensions!
Please, who i can buy this?
8 LBS?! That's so light for a friggin' gigantic hammer! I'm also a huge WoW fan so seeing you replicate this was super fun :D It looks damn good!
Just like an amazing hammer! happeness AMAZING ^_
Badass hammer. I wanna try building Shao Kahn's Wrath Hammer from Mortal Kombat and this is an awesome template, minus the obvious alterations.
Post a Comment