
Guy-Manuel de Homem-Christo is one-half of the french techno group Daft Punk. I was commissioned to make a replica of his iconic gold helmet:

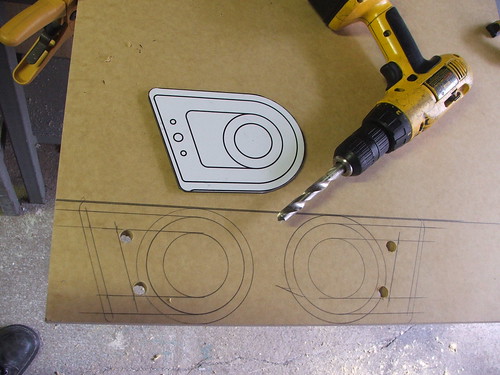
Based off a lot of research images I put together a rendering of the helmet in portrait and profile view, then mounted scaled printouts of these drawings to illustration board. There's a really talented guy named "Featherweight" that makes a variety of props out of cardboard; this was adapted from one of his tutorials:
I know its not much, but bear with me...
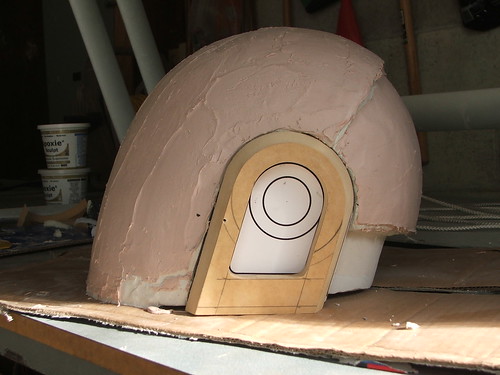
I took this and covered the model in expanding foam...
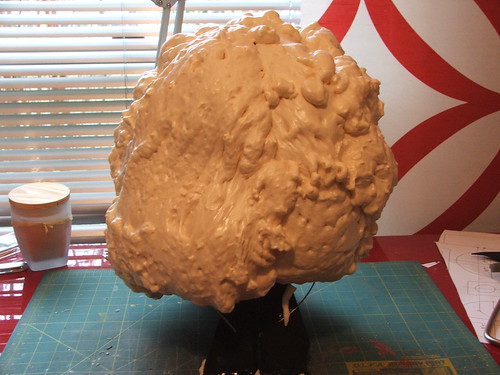
...which was then carved into a rough shape:
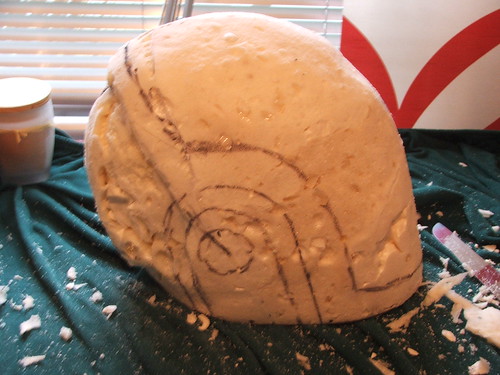
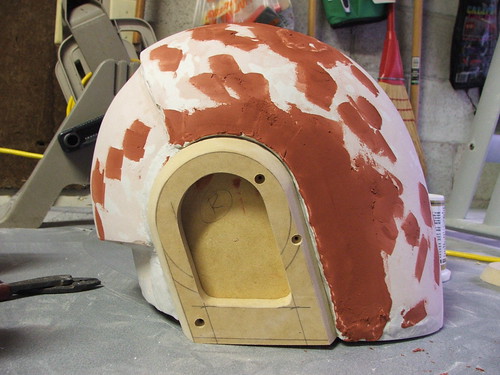
This was the coated in air-drying clay and apoxie sculpt to give me the general shape of the helmet.
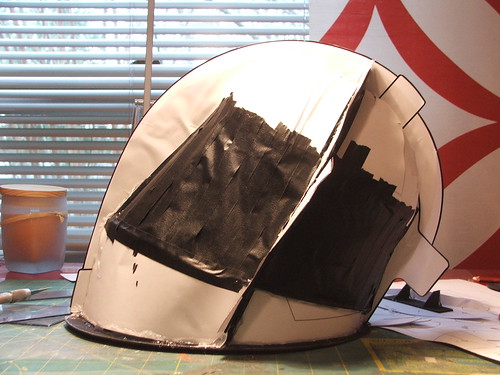
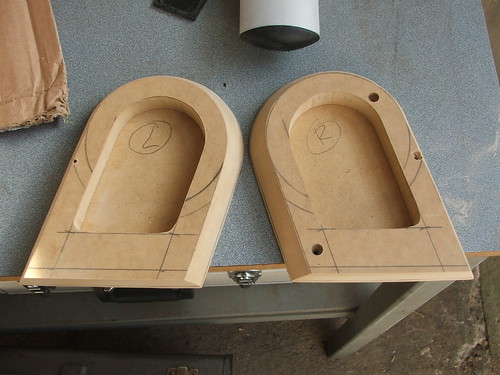
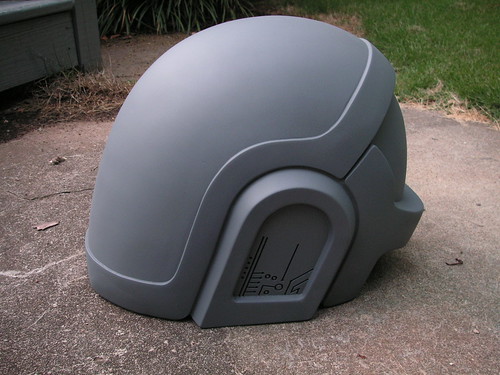
Ear areas were cut out with a jigsaw to make space for the "D" shaped ear pieces in the helmet:

These ear pieces were cut from MDF and beveled on a router, then mounted into the helmet.
Then came the spot putty
...and the bondo...
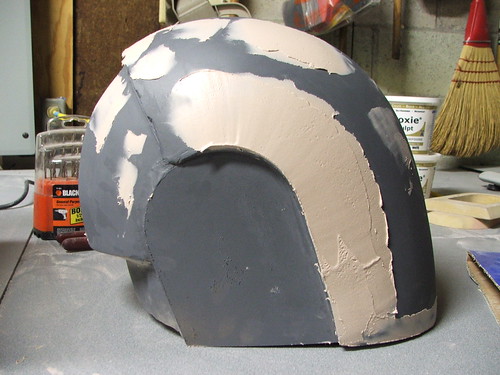
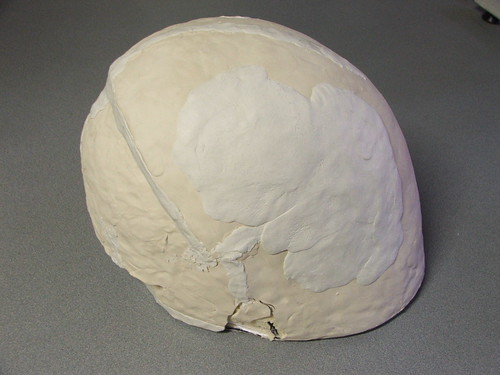
I repeated the above steps (A LOT!) until I was satisfied with the curve of the visor area. After that was defined, I added foam and apoxie sculpt around the hemlet to build up the upper and rear "hoop" areas, as well as the "chin." I'm kind of making up the terms for this as I go, sorry if it gets a bit confusing.
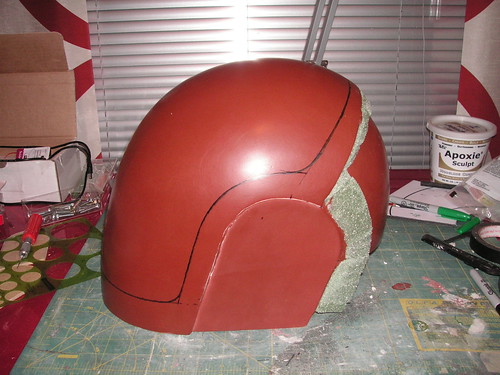
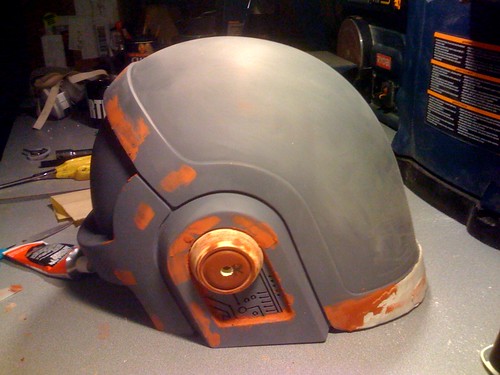
In case anyone is interested, I alternate primer colors when building very smooth props so I can see how far down I'm sanding when I revise the shape of things.
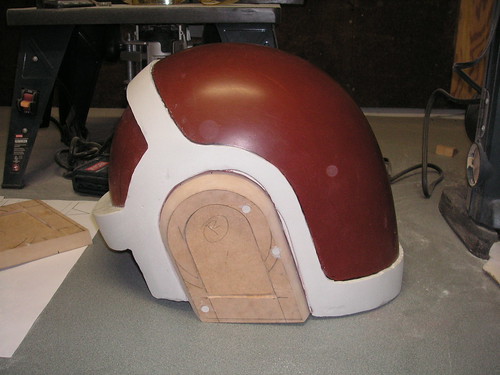
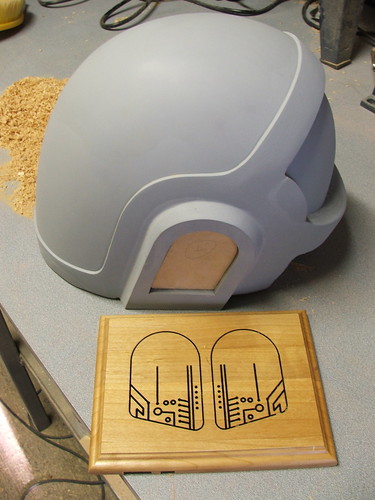
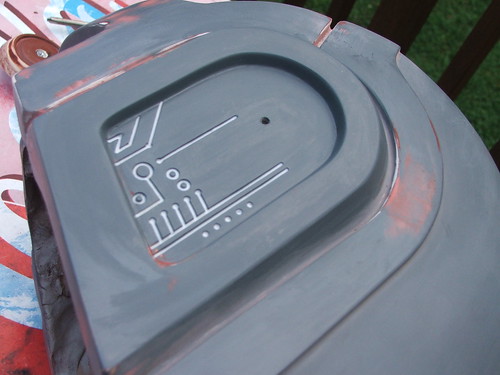
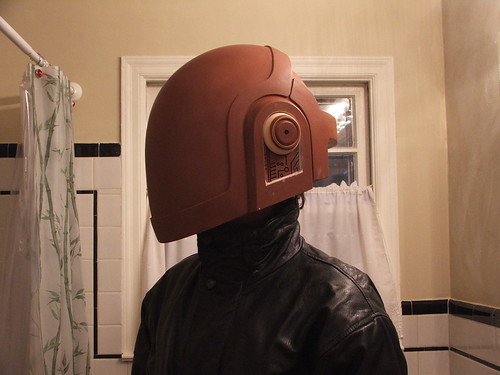
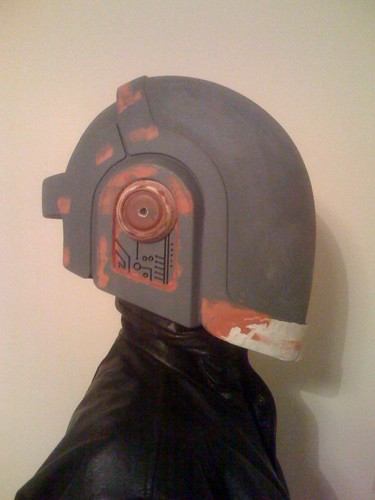
Guy's helmet has a sort of circuit board pattern in the ears, topped off with a beveled "puck" that sits above it in the upper circle area of the ear hoop. I had a local trophy shop laser-cut this circuit board pattern into some 1/2" poplar, which I trimmed and inserted in the ears.
After installing these, I trimmed the lines around the ears and behind the rear hoop with a dremel tool:
Based off some really good reference shots posted on the RPF, I noticed these patterns were cut far too deep. I filled the cavities with resin to level them out a bit:
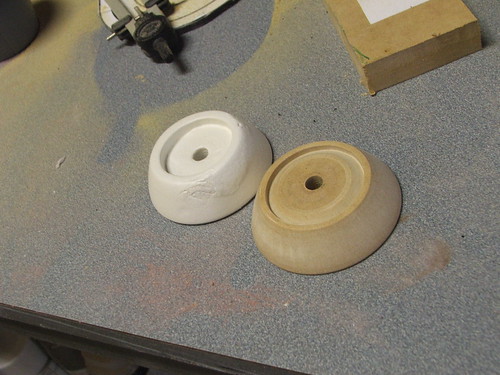
Shown here is one of the ear "pucks" next to a failed test. The one I went with is a MDF piece shaped on a lathe. The one in the background was sculpted out of foam, and couldn't hold detail as well. I ended up molding the MDF one and pulling 2 resin copies of it.
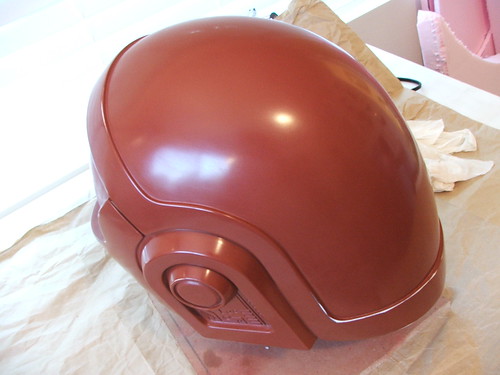
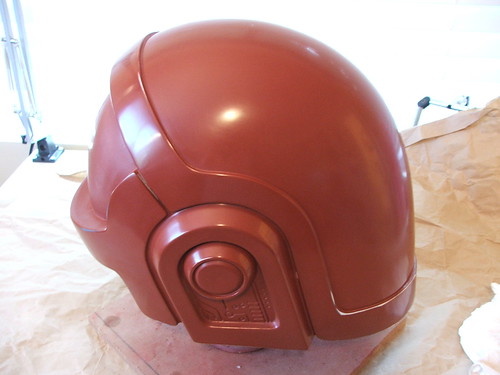
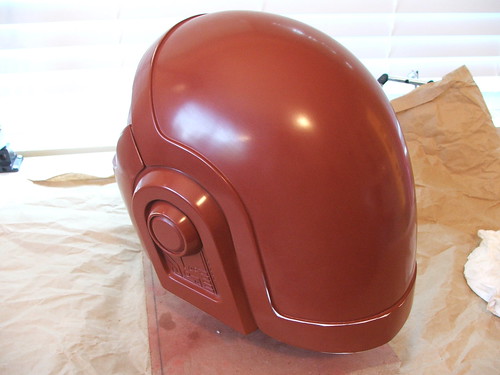
Then, there was more spot putty to fill ever smaller and more minor imperfections. This helmet will eventually be vacuum-metalized in gold chrome, so it needs to be perfect.
The advantage of making the helmet the way I did meant that I could try it on over and over again during the course of the build. I couldn't see anything, but it looked cool nonetheless!
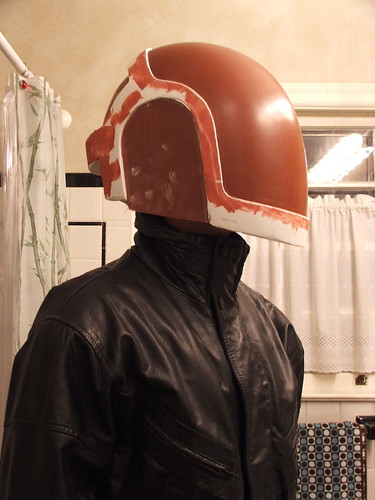
Finally, after some harrowing antics including one late-night trauma where the sculpt was knocked off my workbench, the master was finished and ready for molding. This piece has been wet sanded with 2,000 grit paper and buffed with turtle wax in preparation for molding. Can't wait to pull the resin copies!

Next up is resin casting, electronics, and gold plating... not to mention vacuum-formed visors done by a fellow prop maker friend. Stay tuned!
Sweet! Great work.
ReplyDeleteYou, sir, are a prop magician. Thanks so much for sharing!
ReplyDeleteI'm sure it's a bit of a niche readership, but I, for one, am a fan.
How did you make the white part that appears in the second image after you started using the red primer? I'm talking about the non-visor section of the helmet, that appears when you added the ear pad blocks.
ReplyDelete(P.S. In firefox, I have to use Firebug to increase the height of the iframe of the comment preview to be able to get down to the input for the captcha. Might be preventing others from commenting.)
Couldn't tell you about the Firefox thing... I'm using firefox 3.5.2 on OSX 10.5, no issues here. I have been meaning to build something a bit more detailed than just the blog site though, so hopefully the restructure will resolve it.
ReplyDeleteAs for the white hoops in image #13, those are made out of Apoxie Sculpt, a 2-part air-dry polymer clay. Very strong, if a bit heavy. I sculpted those areas by hand then used an orbital sander to refine the edges.
Would it be possible to grab your profile and head-on templates for your cardboard cross model? I kind of want to undertake the task of making this helmet myself, and was originally going to make it using Pepakura (there is a PDO for Guy Manuel and Thomas)... But I see your method now and really think that might be the best of all ways to go.
ReplyDeleteBig fan of your work, and I hope to see much, much more of it in the future!
(PS -- Also had the problem with the captcha script window being cut off, but instead of using Firebug I just hit tab and the cursor located the field. Weird issue, though.)
Hi Volpin,
ReplyDeleteIve been following this project closely, I have to say it looks fantastic.
I'm also halfway through building a Guy-Man helmet but ive gone down the pepakura route. The helmet isnt as accurate but its not bad and is a good learning curve as Ive never used fibreglass and bondo before.
Ive pretty much finished sanding the frame, next on my list is vacuum forming the visor and rear panel. Ive got some 1.5mm clear PETG which im going to cover with window tint film and then form as usua (Its impossible to get hold of tinted PETG over here in the UK unless its a big order). The film apparently holds up well under heat.
Ive been looking at your circuit designs which look pretty good. How are you planning on diffusing the LEDs mounted in the coloured bars? At the moment im messing around with 5mm superflux LEDs which ive sanded down but they are still too focused.
Very nice ..
ReplyDeleteYour Work is extremely Impressive. I Cant wait for the Update. I love your Attention to detail. Great work
ReplyDeletenow that's just ridiculously cool!,....im following your work on flikr, would love to see what it looks like as soon as you can see out of it. I would love one of these for my pool room wall if that's possible!
ReplyDeleterespects from Australia,
nait_69@hotmail.com if you'd like to make one for me.
Phantom <3 from /cgl here. Lord knows I'm fangirling like mad. I missed a big block of the progress threads so I never saw much of this until the pre-plating shots. Really crazy to see what all goes into such a perfect replica. Or, hell, making an original.
ReplyDeleteYou filling in the too-deep cuts was a killer though. I was reading going 'You've... gotta be kidding me...' That's some epic dedication.
Love love!~
Ari
I've been following your thread on the 405th since the day you started. It look amazing. It inspired me to try and do my own Thomas helmet build.
ReplyDeleteHow do you plan to secure the helmet to your head?
Are you willing to sell a helmet with visor?
ReplyDeleteterrific work!, thanks for sharing work procedure with us.
ReplyDeleteWhen will you be releasing part 2?
ReplyDeleteAmazing work! How much would you sell one of these, wothout electronics, for?
ReplyDeleteAnychance you could post those really good reference shots of the earpiece circuit board patern posted on the RPF?
ReplyDeleteawesome...can you make me one now that you have the mold?
ReplyDeleteAren't you by any chance building this things for the real Daft Punk guys?
ReplyDeleteHey, what kind of expanding foam are you using? Spray on? What did you use to carve it down?
ReplyDeletei'm not sure if you referred to this already,
ReplyDeletehow much did it cost in total to make this helmet?
**without electronics
ReplyDeleteinspirational! i have dozens of things i MUST try because of your teachings.
ReplyDeletethx for being awesome.
oh boy this is wonderful!
ReplyDeletedo some things that is amazing!
The coolest thing I've ever seen - how much to make one for me ??? I'm serious
ReplyDeleteI'm doing something similar with the expanding foam and i was wondering what u used to carve it? im a big fan and the project I'm working on would not be possible without the inspiration.
ReplyDeleteDid you use AB Foam for this?
ReplyDeleteHello, I just wanna say that I stumbled on ur video on youtube and saw ur web page... You are AWESOME! I want a helmet for my older brother, but seeing all the costs n hard work you put into those helmets, I cant ask of you to make one for me and I cant afford to buy one either so I was just wondering if I can have ur initial mold that is in the first picture on Daft Punk Helmet Part 1. It may take longer for to create the helmet than you did but I would appreciate it if you were to help me get started. Thank you!
ReplyDeleteHey, 4 things can u tell me where to get bondo, expanding foam, spot putty and apoxie?
ReplyDeleteOH MY GOD
ReplyDeletehow much would it cost me to get one of these?
i am so serious.
What is the radius of the largest circle on the "D" shaped ear piece?
ReplyDeleteWAOOOOOW REALLY WONDERFULL IF ONE DAY YOU SELL IT PLEASE SAID ME I'M OK TU BOUGHT IT FOR 5 000 or 6 000€ Thanks you verry much
ReplyDeletedude you are amazing good helmet...u should mix it with chrome or blackk
ReplyDeleteThis is amazing
ReplyDeletei was messing with some air dry clay and not having much luck, just wondering if i got the wrong brand what do you use?
ReplyDeletewhere do you acquire your apoxie sculpt cause prices online are outrageous and i have not been able to find it anywhere otherwise?
ReplyDeleteIncredible! You're an inspiration to me!
ReplyDeleteI know you've said you're not handing out the schematics, but can you just tell me the measurements of the ear pieces?? AND HOLY CRAP THIS IS AMAZING!
ReplyDeleteHi there! I was wondering what type of primer and bondo did you use??
ReplyDelete[Sorry for my bad english]
ReplyDeleteHi I'm a Daft Punk fan and I want to know if you can give me measures of the wood you used for daft punk thomas helmet !
Thank you !!
[French text that you can translate in google traduction ]
Peux - tu me donner le smesures des plaques en bois utilisés au début de la vidéo où tu fabriques le casque de thomas
Merci !!!